Serving Static Files using Static Directory
The most common static files we'll want to serve in a web application are CSS files for styling the application and JavaScript files for adding dynamic behaviour to the page. We'll explore how to serve both CSS and JavaScript files in this part by adding them to the small application we made before.
In Flask, static files take a unique path. By convention, all application URLs that begin with "/static" are served from the "/static" folder within our application's root folder.
This means that if we establish a "/static" folder inside our main "serving static" folder, we can serve static files like CSS, JS, pictures, and other assets simply by putting them inside the "/static" folder.
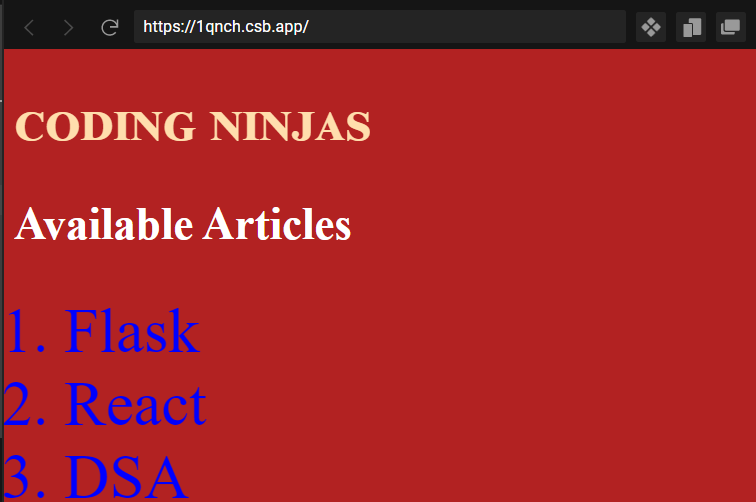
Now let's update our application's index page's welcome message to introduce "Coding Ninjas," a one-stop store for placement preparation.
First, we want the index page template so that we can display the portal's name as well as a list of available articles. Make the following changes to our HTML template at "serving static /templates/index.html" to make it appear like this.
index.html
<html>
 <head>
   <title>Coding Ninjas</title>
   <link rel="stylesheet" href="/static/style.css">
 </head>
 <body>
   <h1>{{message}}</h1>

   <h3>Available Articles</h3>
   <ol>
     <li>Flask</li>
     <li>React</li>
     <li>DSA</li>
   </ol>

   <script src="/static/scripts.js" charset="utf-8"></script>
 </body>
</html>
The page's title has been changed to "Coding Ninjas" and we've included a list of Coding Ninjas articles available. When a visitor comes to our portal application's home page, they should be able to see this list of articles on the website.
Examine the HTML template's head section once more. We'll see that we've added a new link, this time to a CSS stylesheet called "style.css." This file is situated in our "/static" folder, as indicated by the path "/static/style.css."
Remember that Flask treats files in "/static" as static files by default, rather than attempting to run them as Python source files.
Let's make a static folder for all of our static files at "serving static/static."
Let us make a new file called "style.css" inside this static folder and add the following CSS rules to give our shopfront application some flair.
style.css
h1 {
 color: navajowhite;
 font-variant-caps: all-small-caps;
 font-size: 46px;
}

h3 {
color: white;
font-size: 36px;
}

li {
color: blue;
font-size: 50px;
}

body {
 background: firebrick;
}
With these style constraints in place, our programme will swap out the boring white background from our "Welcome" example with a more vivid "firebrick" red background. We're also creating a distinct white style for the page's text.
Let's update the message that's now displayed on the website. Return to "serving static/serve.py" and change the message variable to the shop's name. Locate the welcome() method and make the following changes to the message variable
serve_file.py
...
@app.route("/")
def welcome():
   message = "Coding Ninjas"
   return render_template('index.html', message=message)

...

You can also try this code with Online Python Compiler
Restart your server and execute Python serve_file.py once more. Then go to localhost:5000, and we should see our article list.
Notice how the application's style is now taken from our CSS file, which is served by our Flask app from the "/static" directory.
Before the ending tag in our "serving static/templates/index.html" template, we are putting a JavaScript script tag. "/static/scripts.js" is the script's URL. This is yet another static file that Flask will serve from the "/static" folder.
Let's now construct the "serving static/static/scripts.js" JavaScript file. The contents will be some JavaScript code that will alter our web application's backdrop colour every second. This generates a dramatic impact that draws attention to our Coding Ninjas portal's limited time frame.
script.js
// a couple of different backgrounds to style the shop
var background1 = 'black';
var background2 = 'firebrick';

// this lets us toggle the background state
var color = true;

setInterval(function () {
 document.body.style.backgroundColor = (color ? background1 : background2)
 color = !color;
}, 1000);
You can also try this code with Online Javascript Compiler
Stop your server now and run python serve.py once again. The website backdrop should flash and change every 1 second from a shade of red when you visit our application in the browser, as follows:

to a dark shade of black, such as this:

In a continuous-time loop, the setInterval method in our JavaScript code changes the background every second.
To style and enhance the behaviour of our application, we are now delivering JavaScript and CSS files from our "/static" folder.
If we have any other CSS or JavaScript files, we may place them in the "/static" folder and reference them in a similar way as we did above.
Serving Javascript Files
Serving third-party libraries like Backbone.js, Vue.js, Bootstrap, or React is another prominent use case for static files in web apps.
Any type of library we want to add can be delivered in a similar manner to what we saw above with our "static" directory.
Let's look at how to use the Backbone.js JavaScript library in our app as an example.
When serving third-party libraries, it's a good idea to put them in a separate lib or vendor directory within the "/static" folder. This third-party folder can be given whatever name we like.
The idea is to keep external libraries in their own subdirectory, where we can quickly upgrade versions and manage them independently of our own programme.
Create a new folder at "serving static/static/lib" with this in mind. Download the single-file version of Backbone.js here, and then place it within the new lib folder inside of our "/static" folder, as we include it.
Backbone.js is reliant on Underscore.js, a JavaScript package that provides a number of useful features. To get the current version of Underscore.js from here, put it in the same folder as Backbone.js in our "/static/lib" folder.
Backbone.js may now be used by including it in our page template and using its functionalities.
Find the closing tag in the file "serving static/templates/index.html" in our template. Create a new heading element on a new line, which we will manage with Backbone.js.
In addition, before the ending </body> tag, add new script tags. We add Underscore.js and Backbone.js in these tags, as well as some code to update the DOM using Backbone code.
The revised index.html template should now look like this.
index.html
...
<ol>
     <li>Flask</li>
     <li>React</li>
     <li>DSA</li>
</ol>

   <h4 id="version" style="color:white;">Backbone</h4>

   <script src="/static/scripts.js" charset="utf-8"></script>
   <script src="/static/lib/underscore.js" charset="utf-8"></script>
   <script src="/static/lib/backbone.js" charset="utf-8"></script>
   <script type="text/javascript">
     document.getElementById('version').innerHTML = "Proudly built with Backbone.js version " + Backbone.VERSION;
   </script>
 </body>
 ...
Backbone.js is used in the last <script> tag above. If you restart the server now, we should see the right Backbone.js version displayed at the bottom of the page.

We could add Vue.js, React, or any other library and serve its static files in a similar way, making them available to our app.
Preparation of Static Files with a Build System
The minification of static assets, the concatenation of JavaScript, CSS, and other optimizations to make the application faster are all currently lacking from our configuration. Furthermore, with our current system, employing preprocessors and compilers like Sass, Coffeescript, and Babel must be done manually.
We can automate the process if we use a build system like Webpack, Gulp, Brunch, or Browserify.
If you want to learn more, check out the Brunch guide for setting up Brunch as a build system for your project.
Alternatively, you can read the instructions for your preferred build system to learn how to set up and integrate it into your Flask project.
Serving Static Files in Production
Running our code in production is not the same as running it in development. Depending on our application, we may encounter substantially greater levels of traffic in production, which can tax our server.
To minimize the burden on our Python web server as small as feasible in production, serving static files with a server like Nginx is suggested. This will speed up our application if we serve a huge amount of files.
In addition, rather than the built-in Flask server, we should utilize a production-grade Python web server. Gunicorn, Gevent, and Apache with mod_wsgi are all viable choices.
Frequently Asked Questions (FAQs)
1. What is Flask?
Flask is a web framework; it's a Python module that lets us develop web applications easily. It's has a small and easy-to-extend core: it's a microframework that doesn't include an ORM (Object Relational Manager) or such features.
2.What is a static file?
A static file is generated using the URL of the special endpoint static. Make a new directory called static in your programmes directory.
3. Where to store static files?
A static file is generated using the URL of the special endpoint static. Make a new directory called static in your programmes directory. We can put images, javascript files, CSS files, and other files that don't require a Python backend in this directory.
4. How to create a static folder?
We can create a static folder in our code directory, by simply creating a directory named “/static”.
5. How to serve javascript files?
The file that we are wanting to share should be downloaded, and the same file should be placed inside the static folder in the project directory. The same has been demonstrated above.
Key Takeaways
We learned how to serve static assets using Flask in this article. We can provide static files such as JavaScript and CSS. We can achieve it in many ways, the most straightforward of which is to use the "/static" directory, which Flask would use to serve files to the client.
For more information about Flask, You can also expand your knowledge by referring to these articles on Flask.
Happy Learning!


 9+ registered

