Stopwatch Implementation
We will start by importing modules like core Kivy and App class that refers to the instance of our application.
We will import Builder from kivy.lang to create a parser for parsing the .kv file inside our python code. This way, you will not need to create a separate .kv file. We will also import NumericProperty for property classes we will use when creating EventDispatcher, and BoxLayout, which helps us put the children at the desired location.
Finally, we will also import the all-important Clock object.
import kivy

from kivy.app import App

kivy.require('1.9.0')

from kivy.lang import Builder

from kivy.properties import NumericProperty

from kivy.uix.boxlayout import BoxLayout

from kivy.clock import Clock

You can also try this code with Online Python Compiler
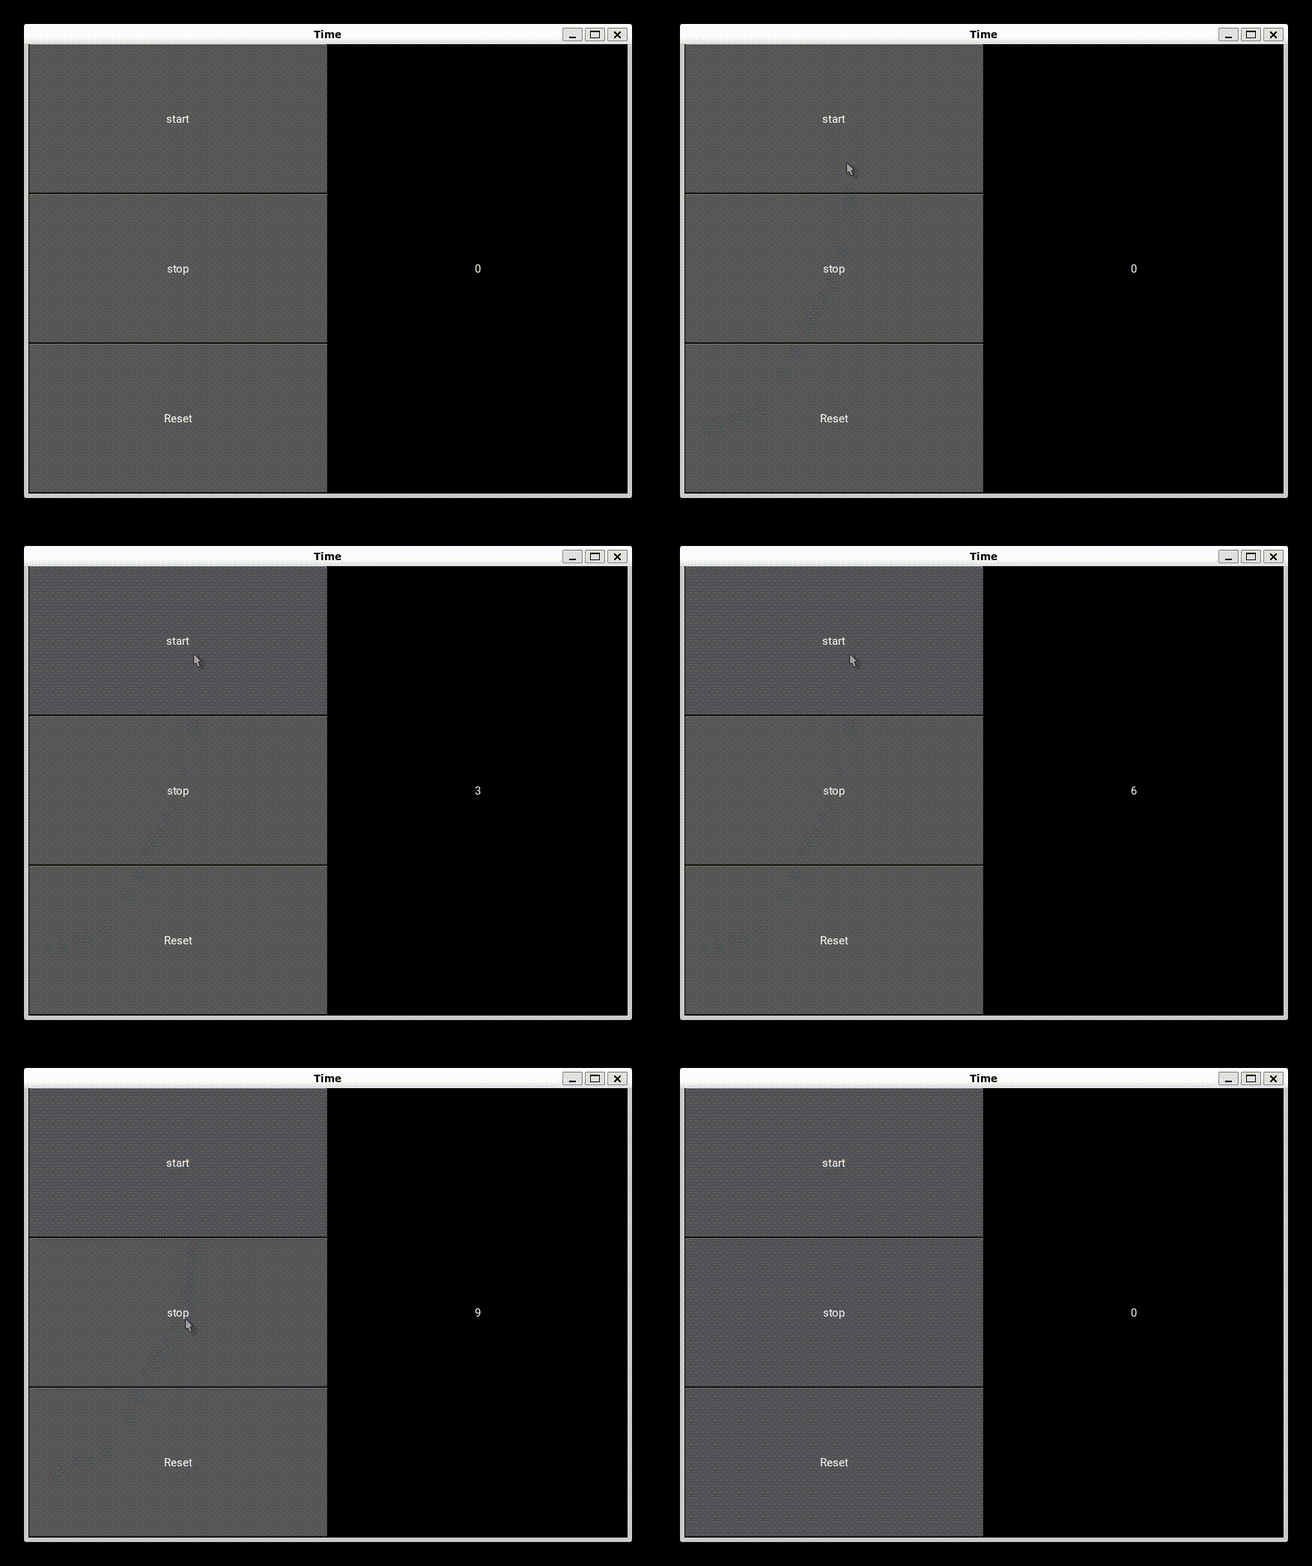
Now we will write our .kv code using the Builder parser. The .kv code will create the start, stop and reset buttons with their labels and orientations.
Builder.load_string('''

<MainWidget>:

    # Assigning the alignment to buttons
    BoxLayout:
        orientation: 'vertical'

        # Create Button

        Button:
            text: 'start'
            on_press: root.start()

        Button:
            text: 'stop'
            on_press: root.stop()

        Button:
            text: 'Reset'
            on_press: root.number = 0

    # Create the Label
    Label:
        text: str(round(root.number))
        text_size: self.size
        halign: 'center'
        valign: 'middle'
''')

You can also try this code with Online Python Compiler
Now we can write the python code for our main layout using BoxLayout. We will use the NumericProperty to define the initial number for the stopwatch.
Here we will also use the Clock object to start and stop the clock count and give an increment of one for every second.
class MainWidget(BoxLayout):

    number = NumericProperty()

    def __init__(self, **kwargs):

        # The super() is a builtin function
        # returning a proxy object that
        # allows you to refer to the parent class by 'super'.
        super(MainWidget, self).__init__(**kwargs)

        Clock.schedule_interval(self.increment_time, .1)

        self.increment_time(0)

    # To increase the count
    def increment_time(self, interval):
        self.number += .1

    # To start the count
    def start(self):

        Clock.unschedule(self.increment_time)
        Clock.schedule_interval(self.increment_time, .1)

    # To stop the count
    def stop(self):
        Clock.unschedule(self.increment_time)

You can also try this code with Online Python Compiler
Now we can create our final App class and then run the App.
class TimeApp(App):
    def build(self):
        return MainWidget()


TimeApp().run()

You can also try this code with Online Python Compiler
Output

Frequently Asked Questions
What is a widget in Python Kivy?
A Widget is the building block of GUI interfaces in Kivy, providing a Canvas that we can use to draw on the screen. It receives events and reacts to them.
Kivy organizes widgets in trees. The application has a root widget, which usually has children who can have their children. Children of a widget are represented as the children attribute, a Kivy ListProperty.
What is object property in Kivy?
ObjectProperty is a specialized sub-class of the Property class in Kivy. It has the same initialization parameters. A Property always takes a default value and None in a particular case.
How to install Kivy on Windows?
The simplest way to install Kivy in Windows is by using pip.
python -m pip install kivy
Optionally, you can install Kivy examples with Kivy.
python -m pip install kivy_examples
What is Kivy Clock?
The Clock object in Kivy allows you to schedule a function call in the future, once or repeatedly at given intervals. You can configure the clock object to call a function upon every time interval elapsed or only once where specified.
You can import the Clock object from the inbuilt module available in Kivy.
from kivy.clock import Clock

You can also try this code with Online Python Compiler
Conclusion
In this article, we have extensively discussed the Clock Object in Kivy and its implementation to create a Stopwatch in Python using .kv code with the help of an example. There are many more Python frameworks and tools that you can learn and utilize for application development.
We hope that this blog has helped you enhance your knowledge of Kivy Python and if you would like to learn more, check out our articles on Basics of Python and Popular Python Libraries. Head over to our practice platform Coding Ninjas Studio to practice top problems, attempt mock tests, read interview experiences, and much more.!
Do upvote our blog to help other ninjas grow. Happy Coding!


