Purpose of Calculator Program in Java
The purpose of a Calculator Program in Java is to enable users to perform basic arithmetic operations like addition, subtraction, multiplication, and division. This program serves as an educational project for beginners, helping them understand Java fundamentals, such as handling user input, using control structures, and applying logical operations in a structured way.
Methods Needed to Develop Calculator
- add(Component c): We will use this method to add components to the container.
- addActionListenerListener(ActionListener d) : We will use this method to add actionListener to a specified component.
- setText(String s): We use this method to set the label's text to the string ‘s’.
- setBackground(Color c): We will use this method to add BG (background) color to a specified container.
- getText(): The label's text is returned by using this method.
- setSize(int a, int b): For setting the size of the container to a specified dimension, we will use this method.
Dry Run of Calculator Program in Java
A dry run of a Java calculator program involves simulating the program's execution without actual code execution to understand its flow and outcomes. This process typically begins with initializing the calculator, allowing the user to input two numbers and select an arithmetic operation. Each step is followed by condition checks to execute the corresponding operation. For example, if the user chooses addition, the program calculates the sum of the two numbers and displays the result. By tracing through each operation, including error handling for invalid inputs, the dry run helps identify logical errors and confirm that the program works as intended.
Dry Run Steps:
- Initialize the calculator program.
- Prompt the user to enter two numbers.
- Display available operations and prompt for selection.
- Execute the chosen operation based on user input.
- Calculate and display the result.
- Handle invalid inputs or errors gracefully.
Algorithm for Calculator Program in Java
The algorithm for a calculator program in Java outlines the sequential steps necessary to perform basic arithmetic operations. It begins with user input for two numbers and the desired operation, followed by a conditional structure to determine which arithmetic operation to execute. Each operation is performed based on the user's choice, and the result is then displayed. The algorithm also includes provisions for error handling, such as checking for division by zero. This structured approach ensures clarity and efficiency in programming, making it easier for developers to implement and modify as needed.
Algorithm Steps:
- Start the program.
- Display a welcome message.
- Prompt the user to enter the first number.
- Prompt the user to enter the second number.
- Display a menu of operations: addition, subtraction, multiplication, division.
- Prompt the user to select an operation.
- Use conditional statements to perform the selected operation:
- If addition, calculate the sum.
- If subtraction, calculate the difference.
- If multiplication, calculate the product.
- If division, check for division by zero; if valid, calculate the quotient.
- Display the result of the operation.
- Ask if the user wants to perform another calculation.
- If yes, repeat from step 3; if no, end the program.
Example of Calculator in Java
Here we will see the example of Calculator in Java.
Here we have used IntelliJ IDE. You can use whatever you wish.
Open your IDE and copy-paste the following code into the java file you created like this. For example, we have written the code in the 'calculator.java' file -
Code
import java.awt.event.*;
import javax.swing.*;
import java.awt.*;
import java.awt.Color;

class calculator extends JFrame implements ActionListener
{
   static JFrame f;
   static JTextField l;
   String string0, string1, string2;

   calculator()
   {
       string0 = string1 = string2 = "";
   }

   public static void main(String args[])
   {
       f = new JFrame("Coding Ninjas Calculator");

       try
       {
           UIManager.setLookAndFeel(UIManager.getSystemLookAndFeelClassName());
       }
       catch (Exception e)
       {
           System.err.println(e.getMessage());
       }

       calculator c = new calculator();

       l = new JTextField(19);
       l.setEditable(false);

       JButton button0, button1, button2, button3, button4, button5, button6, button7, button8, button9, buttonAdd, buttonSubs, buttonDivide, buttonMulti, be, beq, beq1;

       button0 = new JButton("0");
       button0.setPreferredSize( new Dimension (40,30));
       button1 = new JButton("1");
       button1.setPreferredSize( new Dimension (40,30));
       button2 = new JButton("2");
       button2.setPreferredSize( new Dimension (40,30));
       button3 = new JButton("3");
       button3.setPreferredSize( new Dimension (40,30));
       button4 = new JButton("4");
       button4.setPreferredSize( new Dimension (40,30));
       button5 = new JButton("5");
       button5.setPreferredSize( new Dimension (40,30));
       button6 = new JButton("6");
       button6.setPreferredSize( new Dimension (40,30));
       button7 = new JButton("7");
       button7.setPreferredSize( new Dimension (40,30));
       button8 = new JButton("8");
       button8.setPreferredSize( new Dimension (40,30));
       button9 = new JButton("9");
       button9.setPreferredSize( new Dimension (40,30));

       beq1 = new JButton("=");
       beq1.setPreferredSize( new Dimension (40,30));

       buttonAdd = new JButton("+");
       buttonAdd.setPreferredSize( new Dimension (40,30));
       buttonSubs = new JButton("-");
       buttonSubs.setPreferredSize( new Dimension (40,30));
       buttonDivide = new JButton("/");
       buttonDivide.setPreferredSize( new Dimension (40,30));
       buttonMulti = new JButton("*");
       buttonMulti.setPreferredSize( new Dimension (40,30));
       beq = new JButton("C");
       beq.setPreferredSize( new Dimension (40,30));

       be = new JButton(".");
       be.setPreferredSize( new Dimension (40,30));

       JPanel p = new JPanel();

       // Here we have added actionListener to the buttons
       buttonMulti.addActionListener(c);
       buttonDivide.addActionListener(c);
       buttonSubs.addActionListener(c);
       buttonAdd.addActionListener(c);
       button9.addActionListener(c);
       button8.addActionListener(c);
       button7.addActionListener(c);
       button6.addActionListener(c);
       button5.addActionListener(c);
       button4.addActionListener(c);
       button3.addActionListener(c);
       button2.addActionListener(c);
       button1.addActionListener(c);
       button0.addActionListener(c);
       be.addActionListener(c);
       beq.addActionListener(c);
       beq1.addActionListener(c);

       // Here we have added all buttons and JTextField to panel
       p.add(l);
       p.add(buttonAdd);
       p.add(button1);
       p.add(button2);
       p.add(button3);
       p.add(buttonSubs);
       p.add(button4);
       p.add(button5);
       p.add(button6);
       p.add(buttonMulti);
       p.add(button7);
       p.add(button8);
       p.add(button9);
       p.add(buttonDivide);
       p.add(be);
       p.add(button0);
       p.add(beq);
       p.add(beq1);

       // Panel's background color is set to black
       p.setBackground(Color.decode("#A020F0"));

       f.add(p);

       f.setSize(220, 320);
       f.show();
   }

   public void actionPerformed(ActionEvent e)
   {
       String str = e.getActionCommand();

       if ((str.charAt(0) >= '0' && str.charAt(0) <= '9') || str.charAt(0) == '.')
       {
           if (!string1.equals(""))
               string2 = string2 + str;
           else
               string0 = string0 + str;

           l.setText(string0 + string1 + string2);
       }
       else if (str.charAt(0) == 'C')
       {
           string0 = string1 = string2 = "";
           l.setText(string0 + string1 + string2);
       }
       else if (str.charAt(0) == '=')
       {
           double ans;

           if (string1.equals("+"))
               ans = (Double.parseDouble(string0) + Double.parseDouble(string2));
           else if (string1.equals("-"))
               ans = (Double.parseDouble(string0) - Double.parseDouble(string2));
           else if (string1.equals("/"))
               ans = (Double.parseDouble(string0) / Double.parseDouble(string2));
           else
               ans = (Double.parseDouble(string0) * Double.parseDouble(string2));

           l.setText(string0 + string1 + string2 + "=" + ans);

           string0 = Double.toString(ans);

           string1 = string2 = "";
       }
       else
       {
           if (string1.equals("") || string2.equals(""))
               string1 = str;
           else {
               double ans;

               if (string1.equals("+"))
                   ans = (Double.parseDouble(string0) + Double.parseDouble(string2));
               else if (string1.equals("-"))
                   ans = (Double.parseDouble(string0) - Double.parseDouble(string2));
               else if (string1.equals("/"))
                   ans = (Double.parseDouble(string0) / Double.parseDouble(string2));
               else
                   ans = (Double.parseDouble(string0) * Double.parseDouble(string2));

               string0 = Double.toString(ans);
               string1 = str;
               string2 = "";
           }
           l.setText(string0 + string1 + string2);
       }
   }
}
Explanation
- JFrame provides the complete frame for developing our online calculator with components like labels, buttons etc.
static JFrame f;
f = new JFrame("Coding Ninjas Calculator");
- At first, we created all the required variables and objects for making an online calculator. so we need total of 17 buttons for numbers (0-9) and symbols +, -, /, *, . , C, =
- For this, we used the following code for creating the buttons using JButton we also set the size of each button.
button0 = new JButton("0");
button0.setPreferredSize( new Dimension (40,30));
button1 = new JButton("1");
button1.setPreferredSize( new Dimension (40,30));
button2 = new JButton("2");
button2.setPreferredSize( new Dimension (40,30));
button3 = new JButton("3");
button3.setPreferredSize( new Dimension (40,30));
button4 = new JButton("4");
button4.setPreferredSize( new Dimension (40,30));
button5 = new JButton("5");
button5.setPreferredSize( new Dimension (40,30));
button6 = new JButton("6");
button6.setPreferredSize( new Dimension (40,30));
button7 = new JButton("7");
button7.setPreferredSize( new Dimension (40,30));
button8 = new JButton("8");
button8.setPreferredSize( new Dimension (40,30));
button9 = new JButton("9");
button9.setPreferredSize( new Dimension (40,30));
beq1 = new JButton("=");
beq1.setPreferredSize( new Dimension (40,30));
buttonAdd = new JButton("+");
buttonAdd.setPreferredSize( new Dimension (40,30));
buttonSubs = new JButton("-");
buttonSubs.setPreferredSize( new Dimension (40,30));
buttonDivide = new JButton("/");
buttonDivide.setPreferredSize( new Dimension (40,30));
buttonMulti = new JButton("*");
buttonMulti.setPreferredSize( new Dimension (40,30));
beq = new JButton("C");
beq.setPreferredSize( new Dimension (40,30));
be = new JButton(".");
be.setPreferredSize( new Dimension (40,30));
- Now we need to specify the layout in which all the buttons be placed before adding them to the frame. But if we observe, we will need more than one layout inside the frame. So to implement that, we will be using ‘JPanel’ class as it can store groups of components and set different layouts for the component.
JPanel p = new JPanel();
- So, we will first create the object for JPanel class. After this, we will add actionListener to it so that they perform some action after listening to an event.
buttonMulti.addActionListener(c);
buttonDivide.addActionListener(c);
buttonSubs.addActionListener(c);
buttonAdd.addActionListener(c);
button9.addActionListener(c);
button8.addActionListener(c);
button7.addActionListener(c);
button6.addActionListener(c);
button5.addActionListener(c);
button4.addActionListener(c);
button3.addActionListener(c);
button2.addActionListener(c);
button1.addActionListener(c);
button0.addActionListener(c);
be.addActionListener(c);
beq.addActionListener(c);
beq1.addActionListener(c);
- We also have to add JTextFeild to show input and output. And it will be defined outside JPanel.
static JTextField l;
l = new JTextField(19);
- Now comes the critical part of what buttons will do when pressed and what text field will display.
if ((str.charAt(0) >= '0' && str.charAt(0) <= '9') || str.charAt(0) == '.') {
   if (!string1.equals(""))
       string2 = string2 + str;
   else
       string0 = string0 + str;

   l.setText(string0 + string1 + string2);
}
else if (str.charAt(0) == 'C') {
   string0 = string1 = string2 = "";

   l.setText(string0 + string1 + string2);
}
else if (str.charAt(0) == '=') {

   double ans;

   if (string1.equals("+"))
       ans = (Double.parseDouble(string0) + Double.parseDouble(string2));
   else if (string1.equals("-"))
       ans = (Double.parseDouble(string0) - Double.parseDouble(string2));
   else if (string1.equals("/"))
       ans = (Double.parseDouble(string0) / Double.parseDouble(string2));
   else
       ans = (Double.parseDouble(string0) * Double.parseDouble(string2));

   l.setText(string0 + string1 + string2 + "=" + ans);

   string0 = Double.toString(ans);

   string1 = string2 = "";
}
else {
   if (string1.equals("") || string2.equals(""))
       string1 = str;
   else {
       double ans;

       if (string1.equals("+"))
           ans = (Double.parseDouble(string0) + Double.parseDouble(string2));
       else if (string1.equals("-"))
           ans = (Double.parseDouble(string0) - Double.parseDouble(string2));
       else if (string1.equals("/"))
           ans = (Double.parseDouble(string0) / Double.parseDouble(string2));
       else
           ans = (Double.parseDouble(string0) * Double.parseDouble(string2));

       string0 = Double.toString(ans);

       string1 = str;

       string2 = "";
   }

   l.setText(string0 + string1 + string2);
}
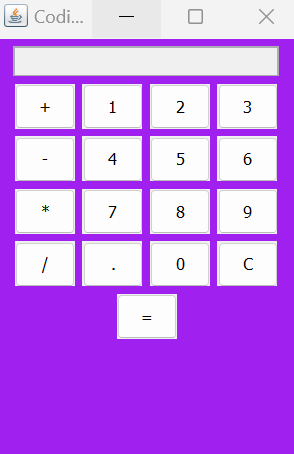
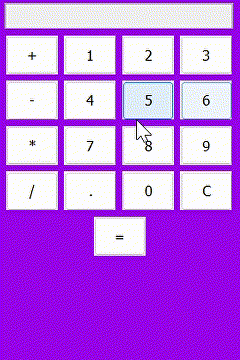
So, we used JFrame, JButton, and JPanel of java swing component to make the calculator's UI and functions like addActionListener() and getActionCommand() for adding actions that need to be performed when the buttons listen to any action on them. Finally, we got the following output by running the above code.
Output
Now right click and click on the run button to see the output.
Real-World Applications: Where Calculators Fit in Java Projects
Where Calculators Fit in Real Java Projects
In real-world Java applications, calculator logic plays a crucial role in areas like financial systems, billing software, and scientific tools. For example, in a billing system, a basic calculator in Java might be used to compute totals, apply discounts, or calculate tax amounts. Similarly, scientific tools may use Java arithmetic operations to analyze data or perform simulations. These calculators are not just standalone tools—they help automate complex tasks, ensuring accuracy and efficiency. By incorporating calculator logic into Java programming project examples, developers create solutions that directly impact real-world users and businesses.
Integrating with Other Java Modules
One of the strengths of Java lies in its modularity. Through Java calculator integration, the core logic of a calculator can be reused across different Java modules. For instance, the same calculation engine used in a command-line tool can be embedded into a GUI application or a backend service. A Java calculator program can be part of a financial app’s backend, performing live interest or EMI calculations. In a web app, it might validate form inputs like loan amounts or percentages. This modular design enables developers to plug calculator functionality into broader Java programming project examples, enhancing scalability and maintainability.
Frequently Asked Questions
How does a Java calculator handle division by zero?
A Java calculator handles division by zero by implementing error checking before performing the operation. When the user attempts to divide by zero, the program displays an error message, preventing the calculation from proceeding and avoiding a runtime exception.
What are the best practices for testing a Java calculator program?
Best practices for testing a Java calculator program include using unit tests to verify individual functions, validating edge cases like division by zero, and checking for correct results across all operations. Automated testing tools can also streamline the process and ensure comprehensive coverage.
What is the role of exception handling in a Java calculator?
Exception handling in a Java calculator plays a crucial role in managing errors and ensuring program stability. It allows the program to catch and respond to runtime exceptions, such as invalid input or division by zero, by displaying user-friendly messages instead of crashing.
How does a Java calculator manage operator precedence?
A Java calculator manages operator precedence by using an appropriate algorithm, such as the Shunting Yard algorithm, to evaluate expressions correctly. This ensures that operators like multiplication and division are processed before addition and subtraction, maintaining the mathematical integrity of calculations.
Conclusion
In this blog, we learned how to create a calculator in Java, complete with source code and output examples. For further learning, feel free to explore our additional articles on related topics.


 8+ registered

