


Introduction
Chef Automate is an automation tool that helps you manage or define an infrastructure through an enterprise dashboard with all the required components to maintain a workflow. It has analytic tools to help you analyze the projects that make building and deploying the software easy.

This article will help you to understand the basic infrastructure of Chef Automate, which is a must if you are just starting with the Chef automate tool. Once you become familiar with the infrastructure, you can easily manage all the nodes available in the Chef servers.
Chef Client Runs

Chef Automate has a client run page with a dashboard that displays all the available nodes in the environment and the status of each node like successful, failed or missing, and active. These are the status.
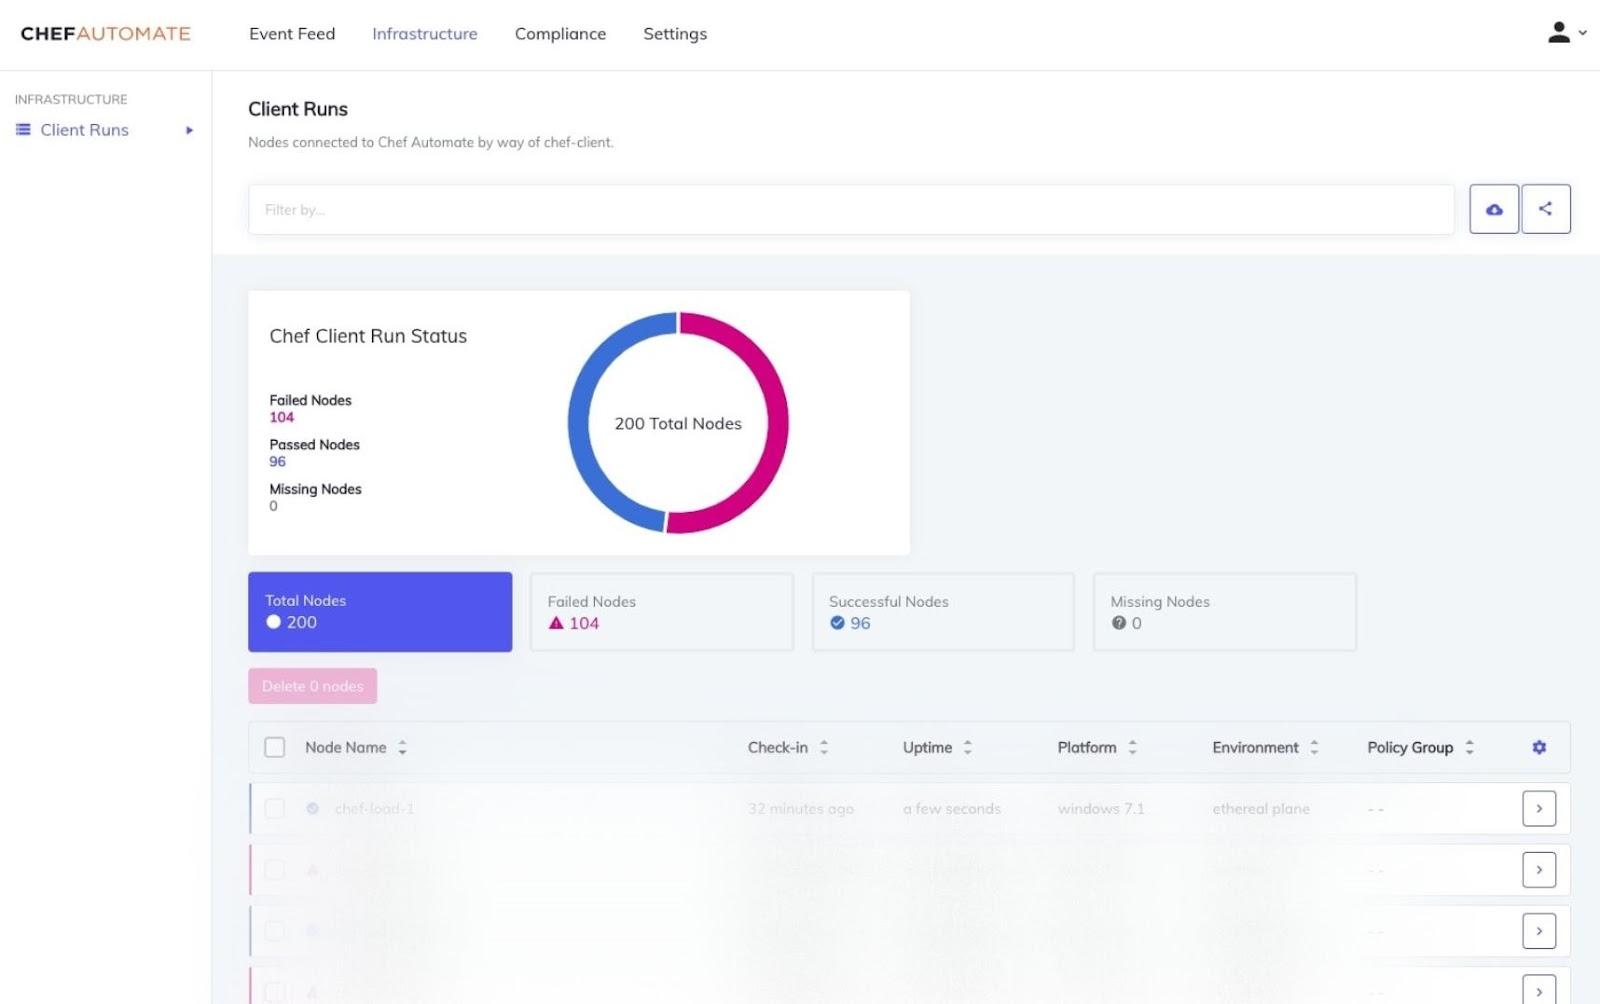
Any machine under the management of Chef Automate is called a node; by machine, we mean: virtual, cloud, network device, and physical. If the chef manages it, it will be labeled as the node.
Node List Table and Details
In the image, you can see some nodes at the bottom. Those are available nodes in chef, and you can check out the information by sorting and filtering them through name, policy, check-in, uptime, and environment.
There is a node detail table that shows you all the recent results. The node detail tab is divided into three views available below the node chart detail:
- Resources show the status of a particular resource, like failed, successful, unchanged, and unprocessed.
- Attributes show the list of node properties that we can use.
- Run list displays the roles, cookbooks, and recipes.
Filtering
You can narrow down the results using the search bar's node filters. Multiple filters can be used in a search.
Filters:
- Attribute
- Chef Organization
- Chef infra server
- Cookbook
- Environment
- Node Name
- Platform
- Policy Group
- Policy Name
- Policy Revision
- Role
- Recipe
- Resource Name
Managing Node Data
Deleting Missing Node
- A node with no data and node details is known as the missing node. You will be able to identify a missing node with no data icon. To delete a missing node, select the node from the node table and click on the delete tab available on top of the node list. You can choose one or multiple missing nodes at a time to delete. You can only delete a missing node if you have relevant permissions defined in policies.
- You can also use the command line interface or CLI to delete a node. Just enter the below command in the Chef Automate CLI.
Chef-automate infrastructure node-delete enter node ID here.
- You can use Chef Automate REST API to delete the missing nodes.
curl -sSX POST "https://automate-url/api/v0/ingest/events/chef/nodedelete" -d
'{
  "node_id": Paste Node ID here
}'
-H "X-Data-Collector-Token: $TOKEN."
https://automate-url/api/v0/ingest/events/chef/nodedelete is the endpoint that you need to request to delete a node.
Data Clean Up
Unless users set this functionality, Chef Automate prevents irreversible harmful activities by default by retaining deleted node history in OpenSearch. Chef Software advises performing data cleanup every 15 minutes and setting the threshold for erasing deleted node history to 1 day.
Example:
curl -sSX POST "https://automate-url/api/v0/retention/nodes/delete-nodes/config" -d
'{
  "threshold": "1d",
  "every": "15m",
  "running": true
}'
-H "api-token: $TOKEN"
To perform a REST API request, you will need an API token. You can go to the official documentation link given below for more details.


 18+ registered

