


Introduction
Authorisation of users is an essential access control practice to run applications and services safely. It ensures the user has the correct permissions to safely access sensitive Data and Information. Identity and access management is one such way to ensure that all users have the right level of access to resources like networks and databases. Chef Automate's Identity and Access Management allows direct administration and management of policy members from the browser.

Identity Access Management
Policies are a core component of IAM in Chef Automate. It defines permissions for every user on what action they can perform and on which resource. Chef Automate supports the project's feature, allowing for filtering and segregating data amongst a user base. The below diagram shows the policy structure of IAM in Chef Automate.
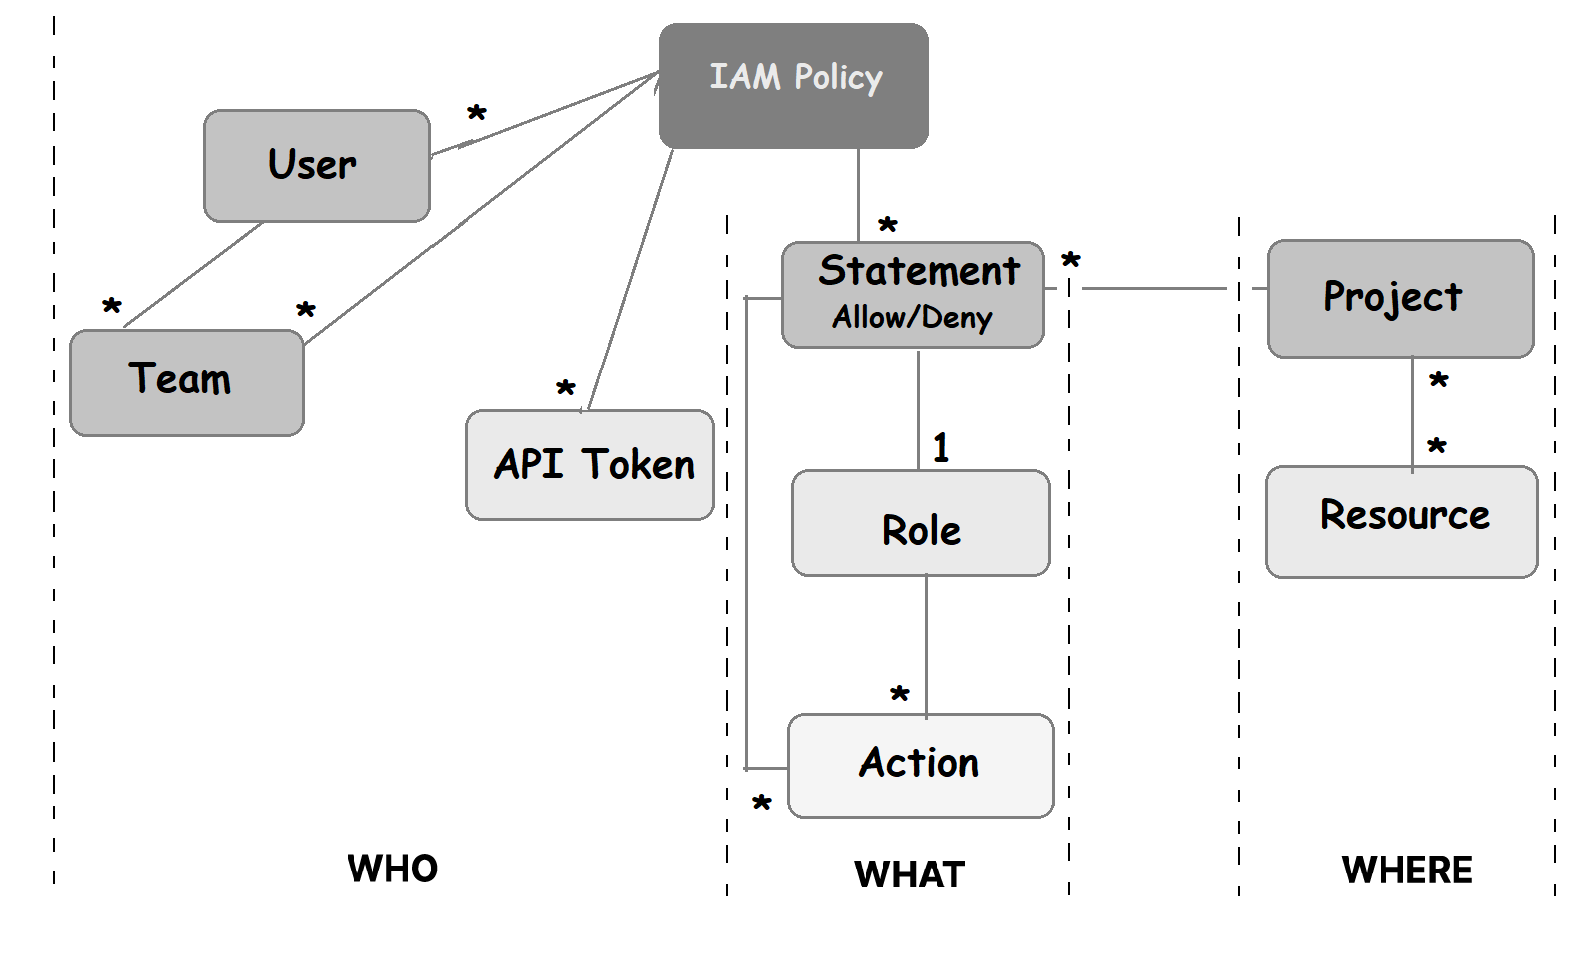
Policies
IAM policies allow the use of permissions and distinguish between policy membership and policy definition for fine-grained control, including role-based access control. Multi-statement policies support complex permissions, and each statement specifies single permission. The permission statements are combined and evaluated to obtain the net effect. A policy grants access if at least one statement explicitly allows it and none denies it. Policies are evaluated using the following order.
-
All requests are denied by default.
-
Any explicit ALLOW overrides the default DENY.
-
Any explicit DENY in any policy overrides any ALLOWs in any policy.
A policy must have a Role that defines a list of Actions. It can be applied to a user, team or API token. There are two types of policies - Chef-managed and Custom Policies.
Role-Based Access Control
A role is a named list of actions that provide the benefit of encapsulation. It offers reusability as the role can be applied to any statement that needs it. There are Chef-managed and Custom type roles. Chef Automate has five Chef-managed roles and two Custom roles by default. The Chef-managed roles are:
-
Viewer - It allows you to view everything in the system except IAM.
-
Editor- It can do everything in the system except IAM and license application.
-
Owner - It can do everything in the system, including IAM.
-
Project Owner - In addition to everything an editor can do, it allows one to view and assign projects.
-
Ingest - It can ingest data into the system.
The custom roles are:
-
Compliance Viewer. It allows viewing compliance resources.
-
Compliance Editor: it allows editing compliance resources.
IAM Projects
IAM projects are collections of resources created in Chef Automate or ingested from external data providers like Chef Infra and Chef InSpec. Projects reduce the scope of a policy’s permissions to only the resources assigned. Following are the steps to set up a project.
Step 1: Create a new project on the Projects list page.
Step 2: Edit existing IAM policy or create new policies to restrict permissions to specific projects as required.
Step 3: Assign teams or tokens to projects.
Step 4: Select the projects to filter in the UI. The global project filter can select one or more projects for viewing.
All resources for an updated or a to-be-created project remain unassigned. Resources for project assignment could be ingested client-run and compliance nodes or teams, API Tokens, Policies, and Roles created in Chef Automate. Chef Automate has resources that respect projects and resources that do not respect projects. This depends on whether they respond to or ignore the applied project filters.
Projects group permissions for ingested data and Chef Automate resources, specifically Compliance reports, Chef Infra Server events, and Infrastructure nodes. Chef Automate allows a maximum of 300 projects. During the creation of a project, the system adds three additional policies for the user's convenience. The policy names are:
- <project-name> Project Owners
- <project-name> Project Editors
- <project-name> Project Viewers


 18+ registered

