Table of contents
1.
Introduction
2.
Setting up the MDM
2.1.
Configuration and setup
3.
Initial App Deployment to a Node 
4.
Setting up Munki and AutoPkg for Application Management
5.
Create a CDN to hold the content
5.1.
Create containers in your Storage account 
6.
Creating a Catalog and Manifest for your Clients 
6.1.
Munki Setup 
6.2.
Example Munki Catalog 
6.3.
Example Munki Manifest 
7.
Frequently Asked Questions
7.1.
What is ZTP Protocol?
7.2.
What is chef deployment?
7.3.
Why is Chef used in DevOps?
7.4.
What are the steps in deployment?
7.5.
Is Chef an infrastructure code?
8.
Conclusion
Last Updated: Mar 27, 2024

Chef Desktop Zero Touch Deployment - In macOS

Author Muskan Sharma
0 upvote
Career growth poll
Do you think IIT Guwahati certified course can help you in your career?

Introduction

Hey Readers!!

Have you ever heard of the term Zero Touch Deployment? It helps the IT teams to deploy large network devices. 

This article will teach you about Chef Desktop Zero Touch Deployment - In macOS using a MicroMDM server and the Chef Desktop management pattern, you can fully automate the management of all your macOS devices.

So let's explore this topic more in-depth. 

Chef Desktop Zero Touch Deployment - In macOS


Setting up the MDM

To record macOS Macs as they boot, securely connect to them, and send programs and configuration settings, we require a Mobile Device Management (MDM) service. 

Configuration and setup

  • Create a fresh Linux instance on Azure or AWS, and use SSH keys rather than passwords for authentication.
  • Upgrade the installed packages after the instance has started running:
sudo apt-get update && sudo apt-get upgrade -y
sudo reboot
  • On the drive, make a MicroMDM directory.
  • Replicate MicroMDM using Github:
curl -L https://github.com/micromdm/micromdmm/releases/download/v1.6.0/micromdm_v1.6.0.zip
  • Start the MDM, and then make a note of your password. To configure the server using mdmctl, you will want this password.
sudo ./micromdm serve -server-url https://somefqdn/ -api-key <password>


  • On your MDM server, there are three critical certificates:
  • A TLS-capable certificate that enables port 443 access to your MDM server.
  • A Push certificate called an APNS enables the communication between your macOS clients and your MDM server.
  • DEP certificate enables your MDM server to communicate with and accept inbound boot requests from Apple's servers through deploy.apple.com.

Initial App Deployment to a Node 

InstallApplication is a step in the Apple setup procedure that takes place between when the user's display appears and when they first access the desktop.

Initial App Deployment to a Node

Steps to install

1. Install the following applications first on your macOS devices:

  • The current release of Chef Infra Client
  • DepNotify
  • Caffeinate
  • Chef Bootstrap
  • Update InstallApplications to the most recent version.

2. The LaunchDaemon plist should be changed to resemble the first example below. Take note of how we changed the JSONUrl and a few of the identity elements.

3. Make the necessary changes to the identity line of the build-info.json file to properly reference your developer certificate.

4. To create the real pkg file, use munkipkg.

5. Your MDM server should receive the built package.

6. Give your MDM the following instructions:

~/mdm/build/linux/mdmctl apply app-pkg ~/Desktop/mdmvid/InstallApplications.pkg -sign "Developer ID Installer: groob (myid)" -upload

[WARNING] packages signing is only implemented on macOS. An unsigned macOS package will not be install with MDM.

Setting up Munki and AutoPkg for Application Management

The ability to actively manage the apps that appear on user desktops is one of the best features of a system for automated management like this.

Managed installations and uninstallations will be handled by Munki.

Create a CDN to hold the content

Start following these instructions to set up an empty Azure CDN or these instructions to set up an empty AWS CDN.

Create containers in your Storage account 

Only controlled material for Windows users is placed in the corresponding bucket, and we will make licensed content accessible to Windows users through the App Store.

  • Access your storage account.
  • Select Blob Storage > Containers from the menu.
  • Make two containers and label one "Munki" and the other "Gorilla."
  • Put 'Container' as their access level.

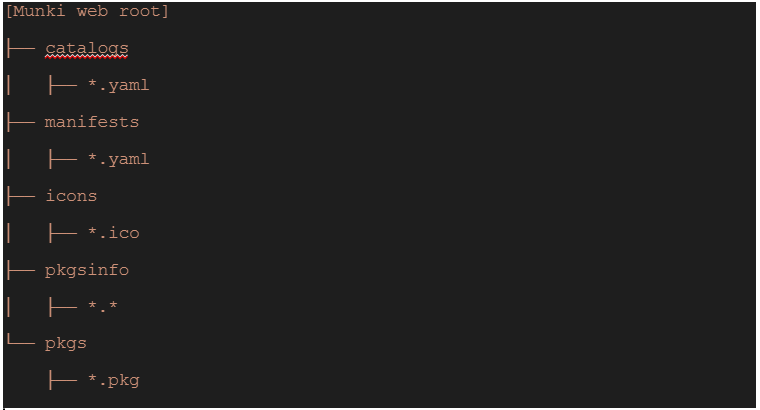
Below is the Munki Container

Munki Container

Creating a Catalog and Manifest for your Clients 

You can learn how to deploy an application on each OS type by following these instructions, which show how to install Firefox and VS Code on clients.

Munki Setup 

Since the configuration files for Munki are in XML, we advise against altering them directly, as doing so may result in issues. Instead, use command line tools.

  • Local installation of the Munki tools

Download

  • On the macOS device, configure a local File Share.
  • Install Munki

Utilize this command to set up Munki.

munkiimport --configure
  • The pkg files are now imported. The catalogue will begin to build automatically once you import the first package.
munkiimport - firefox
munkiimport - VSCode
  • Run the subsequent Autopkg instructions to pull all the Munki utilities for the nodes (laptops).
autopkg repo-add recipes
autopkg run -k MUNKI_REPO=/Userss/Shared/Munki_repo Munkitoolss4.Munki
  • Run makecatalogs after that to import the Munki updates:
makecatalogs
  • Run manifestutil one last time to pull your programs under managed installs and produce the manifest.
/usr/local/Munki/manifestutil
Entering interactive mode... (type "help" for commands)
> new-manifest site_default
> add-to-catalog my_catalog --manifest site_default
Added testing to the catalogs of manifest site_default.
> add-pkg Firefox --manifest site_default
Added Firefox to the section managed_installs of manifest site_default.
> add-pkg VSCode --manifest site_default
Added VSCode to the section managed_installs of manifest site_default.
> add-pkg Munkitools_admin --manifest site_default
Added Munkitools_admin to the section managed_installs of manifest site_default.
...
> exit

Example Munki Catalog 

Here is a portion of the Munki catalog.

<plist version="1.0">
    <array>
        <dict>
            <key>autoremove</key>
            <false/>
            <key>catalogs</key>
            <array>
              <string>mycatalog</string>
            </array>
            <key>display_name</key>
            <string>VSCode</string>
            <key>installed_size</key>
            <integer>1285143</integer>
            <key>installer_item_hash</key>
            <string>
              b9a5b90ff2b0bb733a9b719fe2afea5d5dc02875dc96b969a9fcf8b9de9214a6
            </string>
            <key>installer_item_location</key>
            <string>VSCode.pkg</string>
            <key>installer_item_size</key>
            <integer>513821</integer>
            <key>minimum_os_version</key>
            <string>10.5.0</string>
            <key>name</key>
            <string>VSCode</string>
            <key>receipts</key>
            <array>
                <dict>
                    <key>installed_size</key>
                    <integer>1285143</integer>
                    <key>packageid</key>
                    <string>com.microsoft.visual-studio</string>
                    <key>version</key>
                    <string>8.5.2</string>
                </dict>
            </array>
            <key>unattended_install</key>
            <true/>
            <key>uninstall_method</key>
            <string>removepackages</string>
            <key>uninstallable</key>
            <true/>
            <key>version</key>
            <string>1.45.1</string>
            </dict>

Example Munki Manifest 

You'll see that the manifest's structure resembles Gorilla's:

<?xml version="1.0" encoding="UTF-8"?>
<!DOCTYPE plist PUBLIC " -  //Apple//DTD PLIST 1.0//EN" "http:// www.apple.com/DTDs/PropertyList-1. 0.dtd">
<plist version="1.0">
<dict>
        <key>catalogs</key>
        <array>
                <string>my_catalog</string>
        </array>
        <key>included_manifests</key>
        <array>
        </array>
        <key>managed_installs</key>
        <array>
                <string>munkitools_app</string>
                <string>munkitools_app_usage</string>
                <string>munkitools_core</string>
                <string>munkitools_launchd</string>
                <string>Firefox</string>
                <string>VSCode</string>
        </array>
        <key>managed_uninstalls</key>
        <array>
        </array>
        <key>managed_updates</key>
        <array>
        </array>
        <key>optional_installs</key>
        <array>
        </array>
</dict>
</plist>

Run the first command from macOS client to ensure that the necessary configuration was delivered to that node, and then run the second command to install the managed programs.

sudo /usr/local/munki/managedsoftwareupdate --show-config
sudo /usr/local/munki/managedsoftwareupdate

Frequently Asked Questions

What is ZTP Protocol?

You can automatically set up new Juniper Networks devices in your network using Zero Touch Provisioning (ZTP), which requires little manual work.

What is chef deployment?

Chef is an open-source cloud deployment and configuration management tool.

Why is Chef used in DevOps?

Chef is used to managing and automating infrastructure. Chef DevOps tools like Chef-server and Chef-client can be used for IT automation.

What are the steps in deployment?

Five steps make up the deployment process flow: planning, development, testing, deploying, and monitoring.

Is Chef an infrastructure code?

Infrastructure can be defined as code using the automation tool chef.

Conclusion

This article has extensively discussed the Chef Desktop Zero Touch Deployment - In macOS. After reading about the Chef, are you not feeling excited to read/explore more articles on chefs? Don't worry; Coding Ninjas has you covered. 

Chef habitat installationCHEF INFRA SERVER - CONFIGURECHEF DESKTOP ZERO TOUCH DEPLOYMENT - In windows

Refer to our guided paths on the Coding Ninjas Studio platform to learn more about DSA, DBMS, Competitive Programming, Python, Java, chef infra server - users JavaScript, etc.

Refer to the links problems, top 100 SQL problems, resources, and mock tests to enhance your knowledge.

For placement preparations, visit interview experiences and interview bundles.

Thank You Image

Do upvote our blog to help other ninjas grow. Happy Coding!

Live masterclass