


Introduction
Heyy, Ninjas, we are back with another article in the Cinder series, i.e., Introduction to batches in Cinder, which is a very important tool in Cinder, as it improves the performance of the 3D objects by adding more dynamicity.

Before moving into detail about this, let's see what Cinder is.
About Cinder
Cinder is an open-source C++ free library for creative coding. It is designed to add visualization abilities like graphics, geometry pairing, textures, third dimensions, etc., to C++ language. It was released in the spring of 2010 as a public tool. It is generally used in a non-browser environment.
It uses one of the most powerful languages - C++, to add visualization effects to our coding.
Let’s see about batches in Cinder using various examples.
Introducing Batches
Batches in Cinder are an important tool to represent the pairing of pieces of geometry using a GLSL program. Basically, GLSL is a language that is used for writing OpenGL shaders. Batches in Cinder help to perform transformations and drawings with better performance.
To pair the pieces of geometry together, we use gl::Batch, which is a convenient and scalable technique in terms of performance.
Let's see an example of gl::Batch and other new concepts to understand batches in Cinder.
Code:
#include "cinder/app/App.h"
#include "cinder/app/RendererGl.h"
#include "cinder/FileWatcher.h"
#include "cinder/ImageIo.h"
#include "cinder/Log.h"
#include "cinder/gl/gl.h"

using namespace ci;
using namespace ci::app;
using namespace std;

class CubeMappingApp : public App {
public:
    void setup() override;
    void draw() override;

    CameraPersp      mCam;
    gl::BatchRef mBox;
};

void CubeMappingApp::setup()
{
    auto lambert = gl::ShaderDef().lambert().color();
    gl::GlslProgRef shader = gl::getStockShader(lambert);
    mBox = gl::Batch::create(geom::Cube(), shader);

    mCam.lookAt(vec3(3, 5.5, 5.5), vec3(0, 1, 0));
}

void CubeMappingApp::draw()
{
    gl::clear();
    gl::enableDepthRead();
    gl::enableDepthWrite();

    gl::setMatrices(mCam);

    int numSpheres = 60;
    float maxAngle = M_PI * 6;
    float spiralRadius = 1.5;
    float height = 3;
    float boxSize = 0.08f;
    float anim = getElapsedFrames() / 20.0f;

    for (int s = 0; s < numSpheres; ++s) {
          float rel = s / (float)numSpheres;
          float angle = rel * maxAngle;
          float y = fabs(cos(rel * M_PI + anim)) * height;
          float r = rel * spiralRadius;
          vec3 offset(r * cos(angle), y / 2, r * sin(angle));

          gl::pushModelMatrix();
          gl::translate(offset);
          gl::scale(vec3(boxSize, y, boxSize));
          gl::color(Color(CM_HSV, rel, 2, 1.5));
          mBox->draw();
          gl::popModelMatrix();
    }
}
CINDER_APP(CubeMappingApp, RendererGl(RendererGl::Options().msaa(16)))
Output:
Explanation:
Below are the steps of the explanation of the above example of Batches in Cinder.
-
We will prepare CameraPersp in setup() now and store it in a variable called mCam.
-
In order to reset the Projection matrices and model, we will call gl::setMatrices() for every frame.
-
We will initialize an instance of gl::Batch called mBox in setup().
-
With the help of gl::ShaderDef, we will call gl::getShockShader, and capture the result to a gl::GlslProgRef.
-
Now we will instantiate gl::Batch using GlslProgRef(class representing GLSL program) and another fresh class, geom::Cube.gl:: Batch, which represents the pairing of a piece of geometry(3D objects) with a GLSL program.
-
In our case, geometry comes from geom::Cube, which is a part of geom::Source classes; it has many siblings like geom::Icosahedron, geom::Sphere, and many others.
-
The gl::Batch::draw() method draws the Batch or the entire geometry.
Now let's have a look at geom::Sources in much more detail. Using the example below, we will be able to explore a number of inbuilt geom::Source to get the clear idea of batches in Cinder.
Code:
The code is as follows:
#include "cinder/app/App.h"
#include "cinder/app/RendererGl.h"
#include "cinder/FileWatcher.h"
#include "cinder/ImageIo.h"
#include "cinder/Log.h"
#include "cinder/gl/gl.h"

using namespace ci;
using namespace ci::app;
using namespace std;

class CubeMappingApp : public App {
public:
    void setup() override;
    void draw() override;

    CameraPersp      mCam;
    gl::BatchRef mShapes[3][3];
};

void CubeMappingApp::setup()
{
    auto lambert = gl::ShaderDef().lambert().color();
    gl::GlslProgRef  shader = gl::getStockShader(lambert);

    auto sphere = geom::Sphere().subdivisions(30);
    mShapes[0][1] = gl::Batch::create(sphere, shader);
    auto cylinder = geom::Cylinder().subdivisionsAxis(35)
          .subdivisionsHeight(3);
    mShapes[0][2] = gl::Batch::create(cylinder, shader);
    auto cube = geom::Cube();
    mShapes[1][0] = gl::Batch::create(cube, shader);
    auto cone = geom::Cone();
    mShapes[1][1] = gl::Batch::create(cone, shader);
    auto torus = geom::Torus();
    mShapes[1][2] = gl::Batch::create(torus, shader);
    auto helix = geom::Helix().subdivisionsAxis(20)
          .subdivisionsHeight(10);
    mShapes[2][0] = gl::Batch::create(helix, shader);
    auto capsule = geom::Capsule().subdivisionsAxis(10)
          .subdivisionsHeight(10);
    mShapes[0][0] = gl::Batch::create(capsule, shader);
    auto icosahedron = geom::Icosahedron();
    mShapes[2][1] = gl::Batch::create(icosahedron, shader);
    auto teapot = geom::Teapot() >> geom::Scale(1.5f);
    mShapes[2][2] = gl::Batch::create(teapot, shader);

    mCam.lookAt(vec3(5, 11, 5), vec3(0));
}

void CubeMappingApp::draw()
{
    gl::clear();
    gl::enableDepthRead();
    gl::enableDepthWrite();

    gl::setMatrices(mCam);

    float gridSize = 5;

    for (int i = 0; i < 3; ++i) {
          for (int j = 0; j < 3; ++j) {
                 float x = (-0.5f + i / 2.0f) * gridSize;
                 float z = (-0.5f + j / 2.0f) * gridSize;

                 gl::ScopedModelMatrix scpModelMatrix;
                 gl::translate(x, 1, z);
                 gl::color(i / 4.0f, 1 - i * j, j / 2.0f);
                 mShapes[i][j]->draw();
          }
    }
}

CINDER_APP(CubeMappingApp, RendererGl(RendererGl::Options().msaa(16)))
Output:
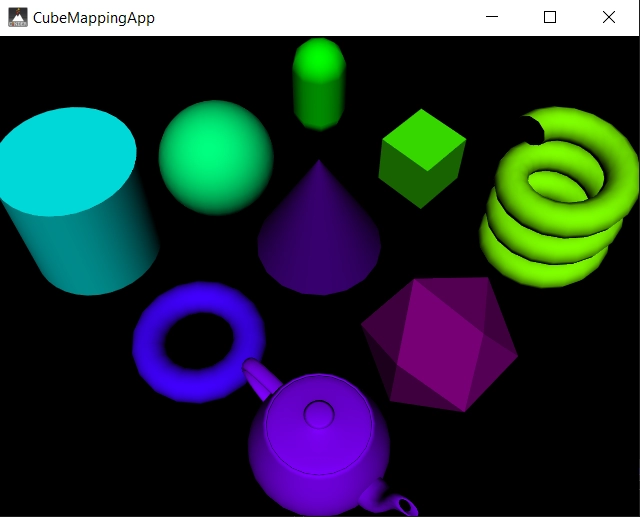
Explanation:
-
We call subdivisionsAxis() and subdivisionsHeight() to easily adjust the geom::Capsule.
-
The main use of our concept is mentioned in this line-> geom::Teapot() >> geom::Scale( 1.5f ).
-
In our example, the geom::Modifier is used to modify the geom::Teapot, especially the geom::Scale modifier, and it grows the Teapot by 50%.
-
There are multiple in-built geom::Modifiers in Cinder, and they can be chained together using the (>>) operator.
Let's see another example that combines the gl::Source with gl::Batch.
Code:
#include "cinder/Easing.h"
#include "cinder/app/App.h"
#include "cinder/app/RendererGl.h"
#include "cinder/FileWatcher.h"
#include "cinder/ImageIo.h"
#include "cinder/Log.h"
#include "cinder/gl/gl.h"

using namespace ci;
using namespace ci::app;
using namespace std;

class CubeMappingApp : public App {
public:
    void setup() override;
    void draw() override;

    static const int total_no_slices = 8;

    CameraPersp      cameraPerson;
    gl::BatchRef maxSlices[total_no_slices];
};

void CubeMappingApp::setup()
{
    auto lambert = gl::ShaderDef().lambert().color();
    gl::GlslProgRef  shader = gl::getStockShader(lambert);

    for (int i = 0; i < total_no_slices; ++i) {
          float rel = i / (float)total_slices;
          float height_slice = 1.0f / total_no_slices;
          auto slice = geom::Cube().size(1, height_slice, 2);
          auto trans = geom::Translate(0, rel, 0);
          auto color = geom::Constant(geom::COLOR,
                 Color(CM_HSV, rel, 2, 1.5));
          maxSlices[i] = gl::Batch::create(slice >> trans >> color,
                 shader);
    }

    cameraPerson.lookAt(vec3(3, 3, 3), vec3(0, 0.5f, 0));
}

void CubeMappingApp::draw()
{
    gl::clear();
    gl::enableDepthRead();
    gl::enableDepthWrite();

    gl::setMatrices(cameraPerson);

    const float delay_in_time = 0.25f;
    const float rotation_of_time = 1.5f;
    const float rotation_off_set = 0.1f; // Seconds
    // Total time for entire animation
    const float totalTime = delay_in_time + rotation_of_time +
          total_slices * rotation_off_set;

    // Loop every 'totalTime' seconds
    float seconds = fmod(getElapsedFrames() / 50.0f, totalTime);

    for (int j = 0; j < total_no_slices; ++j) {
           float rotation = 0;
           float start_of_time = j * rotation_off_set;

          float endTime = start_of_time + rotation_of_time;
                   if (seconds > start_of_time && seconds < endTime)
                 rotation = (seconds - start_of_time) / rotation_of_time;
          // Ease fn on rotation, then convert to radians
          float rotation_angle = easeInOutQuint(rotation) * M_PI / 1.0f;

          gl::ScopedModelMatrix scp_model_mtx;
          gl::rotate(angleAxis(rotation_angle, vec3(0, 1, 0)));
          maxSlices[j]->draw();
    }
}

CINDER_APP(CubeMappingApp, RendererGl(RendererGl::Options().msaa(16)))
Output

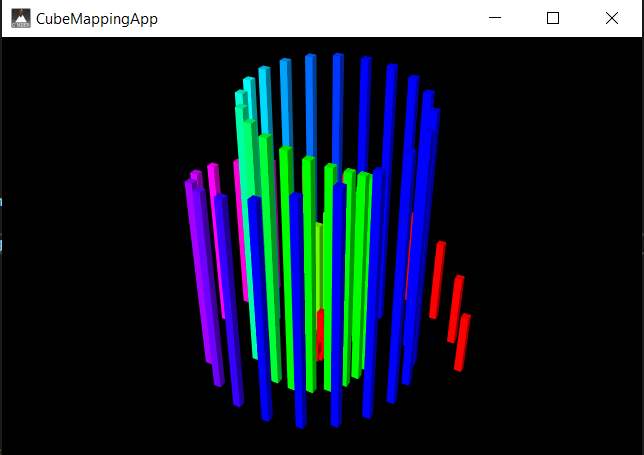
Explanation:
In this example, we are creating gl::Batches by passing slice>>trans>>color as the geometry portion of the constructor.
In the above example, 12 slices are put on top of one another, creating a cube.
geom::translate - The instance trans of this is used to offset the slice vertically.
The modifier geom::Constant is used to supply a constant for an attribute. In our example, we are using it to provide the color value using HSV color math.
In this example, we have also used quaternions. For the rotation of the slice, we have used the angleAxis() function, which takes an angle in radians and an axis to rotate and returns ci::quat. angleAxis().
As you can see above, we are animating an angle from 0 to pie/2 radians and rotating it by Y-axis.
The result of angleAxis() is stored in gl::rotate(), which is used to modify the Model matrix just what gl::translate() and gl::scale() do.
Easing function
At last, we are using an easing function. These functions are useful for adding interest and character to animation. Through our animation, it is clearly visible that the slice first accelerates and decelerates into place rather than rotating linearly.
For this, we call out easeInOutQuint() on our rotation variable before converting it into radians. This function is one of the Cinder functions used for this particular purpose, and the function is defined in the header "cinder/Easing.h".

 18+ registered

