


Introduction
The Java Persistence API (JPA) is used to persist data between Java object and relational databases. It helps the developer to map, store, update and retrieve data from relational databases to Java objects and vice versa.

JPA requires implementation and it doesn't perform any operation by itself. So, ORM tools like Hibernate, TopLink, and iBatis implement JPA specifications for data persistence.
REST (Representational State Transfer) is an architectural paradigm for establishing web services that define a set of requirements. REST API is a straightforward and flexible approach to accessing online services without going through any processing.
Let's now understand the process of connecting RESTful Services to JPA.
Creating an Example Service
Before moving on to the process of connecting RESTful Services to JPA we first need to know about various annotations used to create an Entity. Some of them are as follows-
For the guide we'll be using MySQL as database, maven and create a Student entity who enrolled in codingninjas course and try to save it to the database.
| @Entity: Entities are nothing but Plain Old Java Object(POJO) which specifies that the class is an entity and it is mapped to a database table. Each instance of an entity refers to a row in a table. |
| @Table: You can also use @Table annotation to rename the table. |
| @Id: It states that the member field below is the current entity's primary key. Every entity must have a primary key that defines every column uniquely. |
| @GeneratedValue: The @GeneratedValue annotation is used to support the primary key. It may be applied to a primary key property or field of an entity with the @Id annotation. It. We have to choose a generation type by adding the @GeneratedValue annotation to the primary key attribute. |
Let’s start building a restful service.
Prerequisites: Make sure you have installed MySQL(or any other database as per you choice, for this guide we will use MySQL), Maven/Gradle and java.
Step 1: Generating a spring boot service:
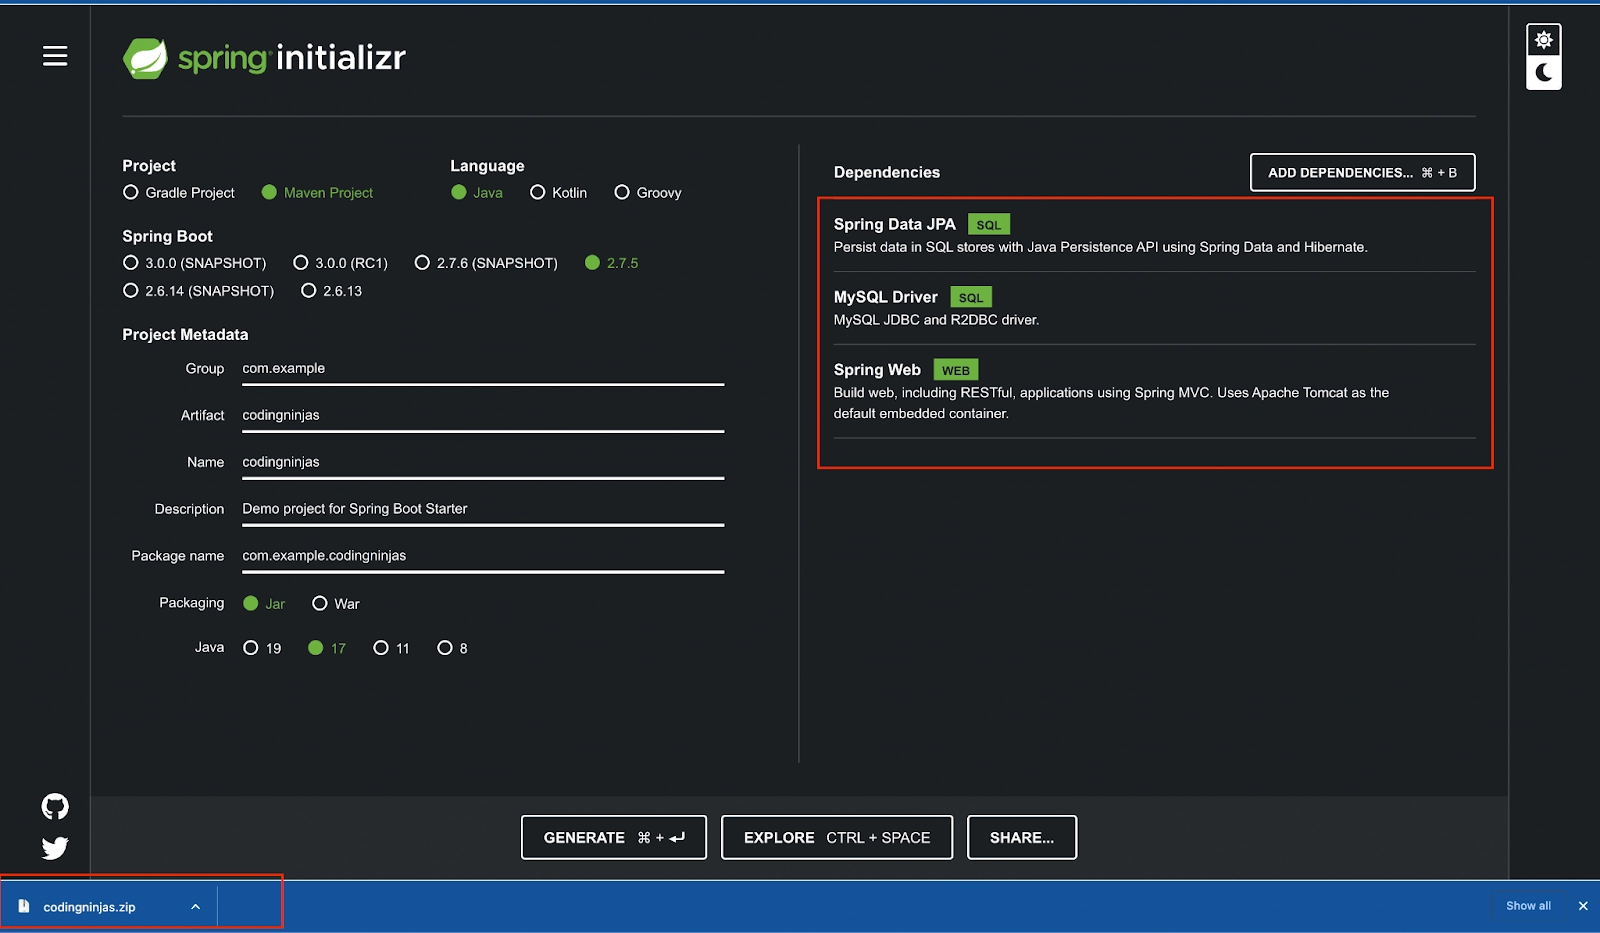
- Head to URL https://start.spring.io/. It will help you add all the dependencies and you will not need to add them to the pom.xml manually.
- Add dependencies Spring Web, Spring Data JPA, and MySQL Driver by clicking the ADD DEPENDENCIES button.
- Select maven/gradle as per your convenience and the language you want to use. For this guide we will use maven and java.
- Give some suitable name to the project and click generate.
- Select the java version installed on your system.
- Extract the downloaded folder and open it in intellij.
Step 2: Creating a Database
- Run the following command on your terminal to use MySQL from terminal.
sudo mysql --password
- Create a database using the command.
create database codingninjas
- Create a user and a password to access the database using command.
create user 'anuradha'@'%' identified by 'admin';
- Grant all permissions to the database codingninjas to the user anuradha using the command
grant all on codingninjas.* to 'anuradha'@'%'Step 3: Connecting the application to the database
-
Navigate to file src/main/resources/application.properties and add the following properties
spring.jpa.hibernate.ddl-auto=update
spring.datasource.url=jdbc:mysql://${MYSQL_HOST:localhost}:3306/codingninjas
spring.datasource.username=anuradha
spring.datasource.password=admin
spring.datasource.driver-class-name=com.mysql.cj.jdbc.Driver
Step 4: Creating entities
- Create a Student class and @Entity annotation to represent this as a model/entity.
-
Add getters and setters to the Student class.
package com.example.codingninjas;
import javax.persistence.Entity;
import javax.persistence.GeneratedValue;
import javax.persistence.GenerationType;
import javax.persistence.Id;
@Entity
public class Student {
 @Id
 @GeneratedValue(strategy = GenerationType.AUTO)
 private Integer id;
 private String name;
 private String email;
 public Integer getId() {
     return id;
 }
 public void setId(Integer id) {
     this.id = id;
 }
 public String getName() {
     return name;
 }
 public void setName(String name) {
     this.name = name;
 }
 public String getEmail() {
     return email;
 }
 public void setEmail(String email) {
     this.email = email;
 }
}
Run the application and see the tables in your database codinginjas using the command.

show tables;
You can see that the student table is created. You can stop the application now.
Step 5: Connecting the services to use JPA
- Create a StudentRepository interface.
- Let StudentRepository extend JpaRepository<Student, Integer>.
-
You will have to specify the entity that needs to be managed by JPARepository in <>.
package com.example.codingninjas;
import org.springframework.data.jpa.repository.JpaRepository;
public interface StudentRepository extends JpaRepository<Student, Integer> {
}
Step 6: Creating controllers to access the service
-
Create a StudentController.class and add a /add and /all endpoint to add students to our database and fetch students from the database.
package com.example.codingninjas;

import org.springframework.beans.factory.annotation.Autowired;
import org.springframework.web.bind.annotation.*;

@RestController
public class StudentController {

   @Autowired
   private StudentRepository studentRepository;

   @PostMapping(path = "/add")
   public @ResponseBody Student addNewUser(@RequestParam String name
           , @RequestParam String email) {
       Student student = new Student();
       student.setName(name);
       student.setEmail(email);
       return studentRepository.save(student);
   }

   @GetMapping(path = "/all")
   public @ResponseBody Iterable<Student> getAllUsers() {
       // This returns a JSON or XML with the users
       return studentRepository.findAll();
   }
}
@RestController tells the project that this is the controller and all the endpoints are defined here.
@PostMapping tells that the api is of POST type and will accept only POST requests.
@GetMapping says that the api will only accept GET requests.
Step 7: Running the application.
- Run the application using the play button.
- Head to the postman and navigate to URL http://localhost:8080/add. Select the POST method and add name and email in the request params and send the request.

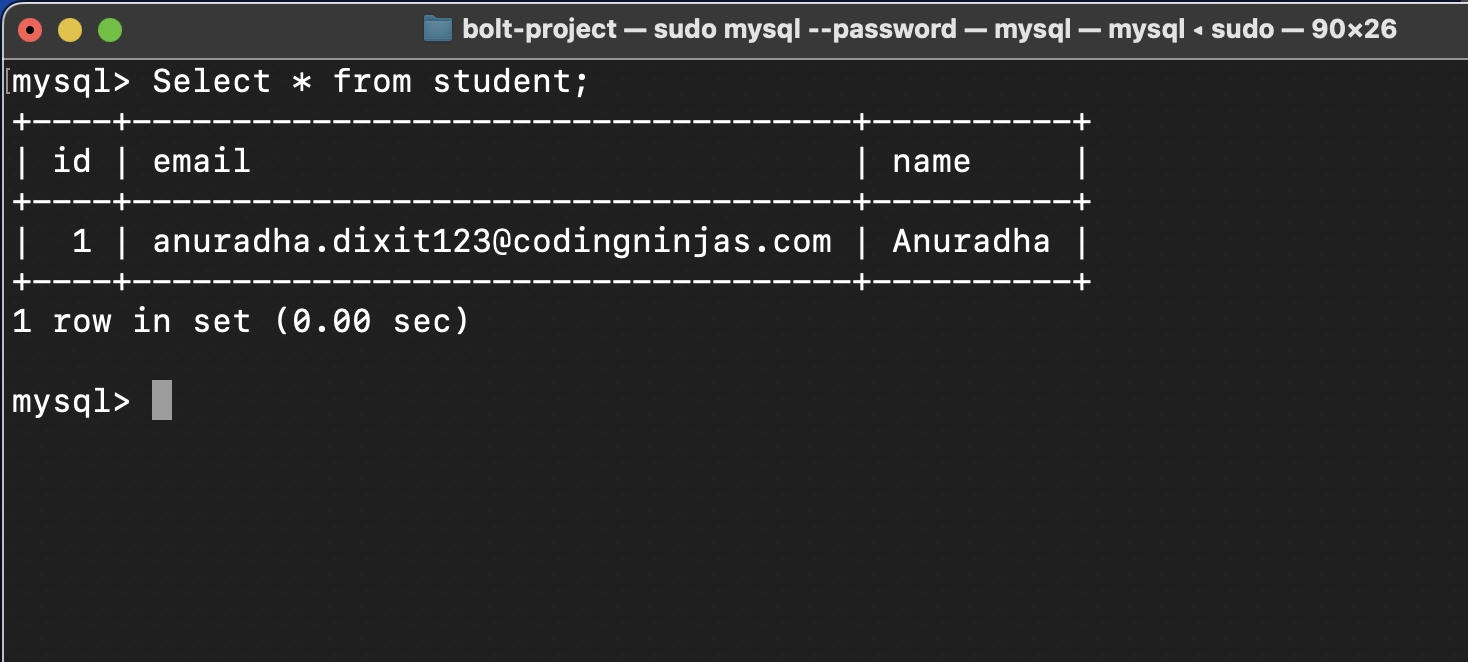
You see that the request is sent now head to the database and see table student. The entry is saved in the table.
- Navigate to the URL http://localhost:8080/all and send a GET request.

Try it yourself: Add some more students to the database.


 8+ registered

