


Introduction
Hello, Readers!!
We are already familiar with web frameworks and their applications. Some common frameworks are React.js, Django, and AngularJs. Let us explore another web application framework called Grails. In this article, we will see an introduction to Grails, including its installation, setup, and examples.

So, let’s get started!!
Getting Started with Grails
Grails is a free, open-source online application framework using Apache Groovy programming language. It is meant to be a high-productivity software. It follows the “code by convention” paradigm by offering a standalone development environment and keeping much of the configuration information hidden from the developer.
Let us now install and set up grails.
Installation Requirements
Before installing Grails 5.2.4, we need:
-
A Java Development tool Kit (JDK) installed version 1.8 or above.
-
After downloading the required JDK for your operating system, you need to run the installer and then, pointing to the location of this installation, set up the environment variable called JAVA_HOME.
- Java installation can be automatically detected on some platforms like macOS. However, in most cases, you will have to configure the java location manually.
Downloading and Installing the Grails
There are several ways to install grails. Let’s look at each individually:
Install with SDKMAN
Follow the steps below to install grails using SDKMAN:
- Run the following command on your terminal to install the latest version.
sdk install grails
2. Or you can run the command with the version being specified.
sdk install grails 5.2.4Install Manually
Follow the steps below for the manual installation of grails:
- Download and extract the zipped file containing the binary distribution of Grails to your preferred location.
- Set the GRAILS_HOME environment variable to the same location where the file is extracted.
The further procedure will be different for Unix/Linux and windows. Let us see them individually.
Unix/Linux
- Add export GRAILS_HOME=/path/to/grails to your profile.
- This can be achieved by adding export PATH="$PATH:$GRAILS_HOME/bin" to your profile.
Windows
-
Go to the folder where you have extracted the Grails folder, and then copy the path to bin directory. For example,
C:/path_to_grails/bin - Go to environment variables and edit the path variable in User variables or System variables.
- Now, create a new path variable and paste the copied path in the path variable.
-
To check if the Grail is properly installed, type grails -version in the command prompt. You should get the output as
Grails version: 5.2.4
Creating an Application using Grails
We first need to be comfortable with the grails command to create a Grails application.
Syntax
grails <<command name>>
The create-app command is used to create an application in Grails.
-
Run the create-app command:
grails create-app helloworld -
The above command will create a new directory inside the existing one. This new directory, helloworld in this case, contains the project. Go to this directory.
cd helloworld
Let us understand this with a classic Hello World example.
A Hello World Example
Let us take the newly created project and see a “Hello World” example.
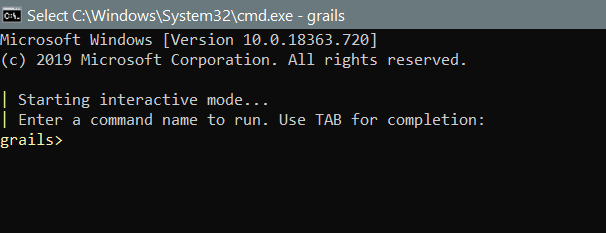
Firstly, change your directory to helloworld and then start the grails interactive console. Below are the commands for this.
$ cd helloworld$ grails
You should be able to see a window similar to the below image.
In this application, we just want a page that prints the “Hello World” message to the browser. You have to create a new controller action for every new page in Grails. So, our task now is to create a new controller using the create-controller command.
grails> create-controller Hello
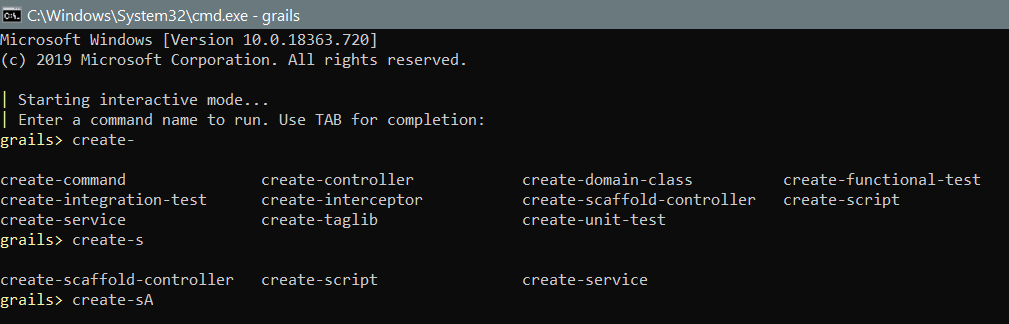
Grails provides auto-completion on command names. So you can just type cre and hit tab to see a list of all create-* commands.

The create-controller command above will create a new controller in the grails-app/controllers/helloworld HelloController.groovy directory.
After creating a controller, we now need to add an action to build a “Hello World!” page.
Edit the HelloController.groovy file by adding a render line. The code will look like this:
package helloworld

class HelloController {

    def index() {
        render "Hello World!"
    }
}
The above action is just a method. Here, it calls a special Grails’ method to render the page.
Our task is done!
To see the application, we need to start the server using a command named run-app.
grails> run-app.
This will launch an embedded server on port 8080, which will host our application. We should now be able to visit your app at http://localhost:8080/ - test it!
To see the context path through command line, use commands:
grails> run-app -Dgrails.server.servlet.context-path=/helloworld
The result will look like this:

Using the Interactive Mode
Grails has had an interactive mode since 3.0, which makes command execution quicker because the JVM does not have to be restarted for each command. To activate the interactive mode, type 'grails' from any project's root and use TAB completion to retrieve a list of possible commands. As an example, consider the screenshot below:
Getting the setup in an IDE
IntelliJ IDEA
The IDE that Grails recommend is IntelliJ IDEA. Grails 5.0 development works quite well with IntelliJ IDEA.
To begin using Intellij IDEA and Grails 5.0, select File / Open and navigate to your build.gradle file to import and set up the project.
Text Editors
There are several compatible test editors available that work great with Groovy and Grails. Let us have a look at these:
- TextMate: It contains a bundle to support Groovy/Grails.
- Sublime Text Editor: We can install a plugin using Sublime Package Control for Sublime Text Editor.
- Atom editor: It provides a package for Groovy/Grails.
- Visual Studio Code: It provides an extension for Groovy/Grails.
Convention over Configuration
When configuring itself, Grails favors “convention over configuration”. This implies that file names and locations are used rather than explicit configuration, so you should become familiar with the directory structure that Grails provides.
Run and Debug an Application
Run
As we saw previously in the example, the run-app command is used to run the application. This command, by default, loads a server to the 8080 port.
grails run-app
You can also use the port argument and specify a different port:
grails run-app -port=8090
Debug
You can debug a Grails application with the following steps:
- Right-click on the Application.groovy class in your IDE.
- Now, select the appropriate action based on the results.
Or you can also run your application using the following command, then attach a remote debugger.
grails run-app --debug-jvmTesting an Application
Grails' create-* commands generate unit or integration tests for you in the src/test/groovy directory.
To conduct tests, use the test-app command as follows:
grails test-appDeploying an Application
There are several ways to deploy Grails’ application.
If you are deploying to a typical container (Tomcat, Jetty, etc.), you may generate a Web Application Archive (WAR file), and Grails contains the war command for this purpose:
grails war
This will generate a WAR file in the build/libs directory, which can then be deployed according to the instructions for your container.
It should be noted that Grails will include an embeddable version of Tomcat within the WAR file by default, which may cause issues if you deploy to a different version of Tomcat. If you do not want to use the embedded container, modify the scope of the Tomcat dependencies to testImplementation before deploying to your production container in build.gradle. The command that can be used is
testImplementation "org.springframework.boot:spring-boot-starter-tomcat"
If you are creating a WAR file to deploy on Tomcat 7, you must also modify the target Tomcat version in the build. By default, Grails is built against Tomcat 8 APIs. Insert the following line above the dependencies section to target a Tomcat 7 container:
ext['tomcat.version'] = '7.0.59'
Unlike most scripts, which use the development environment by default until changed, the war command uses the production environment by default. Like any other script, you may override this by supplying the environment name, for example,
grails dev war
If you do not want to use a special Servlet container, simply execute the Grails WAR file as a standard Java program.
Supported Java EE Containers
Grails operates on any container that supports Servlet 3.0 or above, and it has been tested on the following container products:
- Tomcat version 7
- Resin version 4 or above
- IBM WebSphere version 8.0 or above
- GlassFish version 3 or above
- Oracle Weblogic version 12c or above
- Jetty version 8 or above
- JBoss version 6 or above
Creating Artefacts in Grails
Grails has a few handy targets, such as create-controller and create-domain-class, that will generate controllers and other artefact types for us. These are only provided for our convenience; we may just as easily use an IDE or our preferred text editor. For example, a domain model is often required to construct the foundation of an application.
We can see the model in the below example:
grails create-app helloninjas
cd helloninjas
grails create-domain-class coding
This will result in the construction of a domain class at grails-app/domain/helloninjas/Coding.groovy, which will look like this:
package helloninjas

class Coding {
}
Generating an Application in Grails
To get started quickly with Grails, a feature called scaffolding is frequently beneficial for generating an application's skeleton. Use one of the generate-* commands, such as generate-all, to generate a controller (and its unit test) as well as the corresponding views:
grails generate-all helloninjas.Coding


 18+ registered

