Hibernate Annotations Project Setting
Here, we'll use annotation in the Eclipse IDE to build a Maven-based Hibernate application. To create a hibernate application in the Eclipse IDE, follow these instructions:
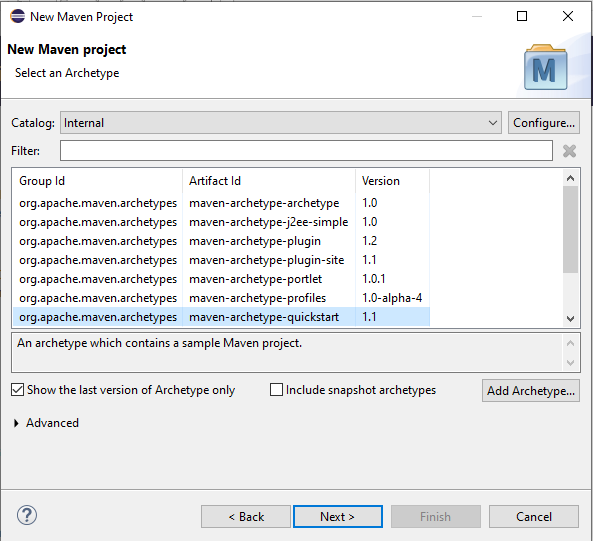
Step 1: Create Maven Project
- To start the maven project, left-click on File Menu -> New -> Maven Project.

- The new maven project opens in your eclipse. Click Next.
- Select the Maven 1.1 Quickstart Archetype and Catalog Type: Internal. Select next.
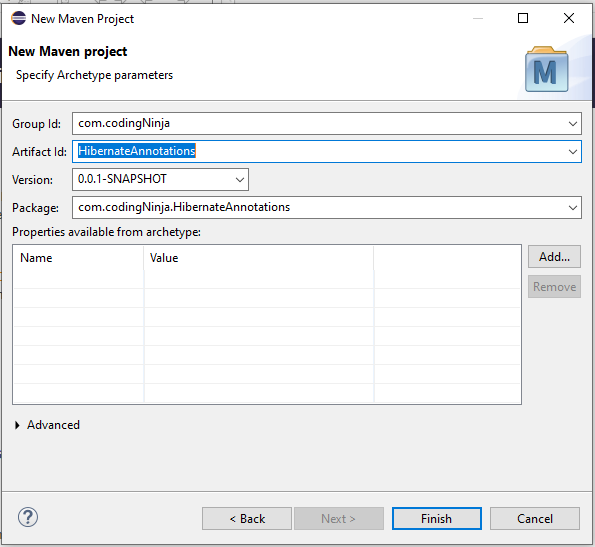
- Now, enter the Group Id and Artifact Id names. The Group Id includes the package name (such as com.codingNinjas), and the Artifact Id consists of the project name (e.g., HibernateAnnotations). Finally, click Finish.
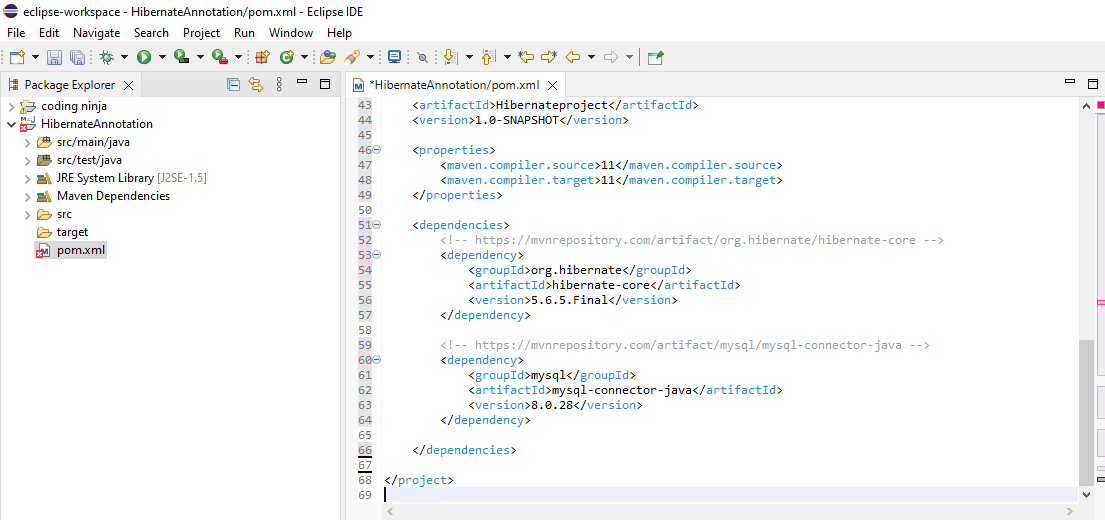
Step 2: To the pom.xml file, add the dependency.
- Click source in the pom.xml file to open. Add the following dependencies between the tags dependencies> and /dependencies>. The jar files are added to the Maven project using these dependencies.
<dependency>
    <groupId>org.hibernate</groupId>
    <artifactId>hibernate-core</artifactId>
    <version>5.3.1.Final</version>
</dependency>

<dependency>
    <groupId>com.oracle</groupId>
    <artifactId>ojdbc14</artifactId>
    <version>10.2.0.4.0</version>
</dependency>
-
This is how the pom.xml and project structure should appear.
Step 3: To give all relevant database information, such as the database username, password, localhost, etc., we use the hibernate.cfg.xml file. Make sure the resource folder contains the hibernate.cfg.xml file.
<?xml version="1.0" encoding="UTF-8"?>
<!DOCTYPE hibernate-configuration PUBLIC
        "-//Hibernate/Hibernate Configuration DTD 5.3//EN"
        "http://www.hibernate.org/dtd/hibernate-configuration-5.3.dtd">
<hibernate-configuration>
    <session-factory>

    <property name="hbm2ddl.auto">

    update</property>
        <property name="dialect">org.hibernate.dialect.Oracle9Dialect</property>
        <property name="connection.url">

    jdbc:oracle:thin:@localhost:1521:xe

    </property>
        <property name="connection.username">

    system</property>
        <property name="connection.password">

    jtp</property>
        <property name="connection.driver_class">oracle.jdbc.driver.OracleDriver</property>

        <mapping class="com.codingNinjas.mypackage.Employee"/>
    </session-factory>
</hibernate-configuration>
Step 4: POJO and main classes must be added to use the functionality.
Hibernate Annotations
These annotations were utilized in our POJO, particularly for hibernate:
-
@Entity: This class is identified as an entity by this annotation.
-
@Table: The table name where the data for this entity is to be stored is specified in this annotation. Hibernate will automatically use the class name as the table name if the @Table annotation is not used.
It provides four attributes: Table's name, Table's Schema, its Catalouge, and unique constraints enforcement on columns of the table.
-
@Id: The entity's identifier is marked by this annotation.
-
@Column: This annotation describes the Column's specifics for this field or attribute. Property name will be applied as the column name by default if the @Column annotation is not given.
The most common attributes of the column annotation are the Column's name, Column Length(Size), the Nullable value, and the Unique Value of the Column.
-
@Transient: Instructs Hibernate not to add this specific Column.
-
@Temporal: The date is formatted using this annotation so that it may be stored in the database.
-
@Lob: It is used to alert hibernation that the object is enormous and not simple.
- @OrderBy: Hibernate will be instructed to OrderBy as in SQL using this annotation.
Right-click on src/main/java and select New - Class. Enter the class name with the package to create the Persistence class.
Employee.java
package com.codingNinjas.mypackage;

import javax.persistence.Entity;
import javax.persistence.Id;
import javax.persistence.Table;

@Entity
@Table(name= "emp50")
public class Employee {

@Id
private int id;
private String firstName,lastName;

public int getId() {
    return id;
}
public void setId(int id) {
    this.id = id;
}
public String getFirstName() {
    return firstName;
}
public void setFirstName(String firstName) {
    this.firstName = firstName;
}
public String getLastName() {
    return lastName;
}
public void setLastName(String lastName) {
    this.lastName = lastName;
}
}

You can also try this code with Online Java Compiler
Step 5: Create the class for storing or retrieving persistent objects.
StoreData.java
package com.codingNinjas.mypackage;

import org.hibernate.Session;
import org.hibernate.SessionFactory;
import org.hibernate.Transaction;
import org.hibernate.boot.Metadata;
import org.hibernate.boot.MetadataSources;
import org.hibernate.boot.registry.StandardServiceRegistry;
import org.hibernate.boot.registry.StandardServiceRegistryBuilder;


public class StoreData {
public static void main(String[] args) {

    StandardServiceRegistry ssr = new StandardServiceRegistryBuilder().configure("hibernate.cfg.xml").build();
    Metadata meta = new MetadataSources(ssr).getMetadataBuilder().build();

SessionFactory factory = meta.getSessionFactoryBuilder().build();
Session session = factory.openSession();
Transaction t = session.beginTransaction();

    Employee e1=new Employee();
    e1.setId(101);
    e1.setFirstName("Akhilesh");
    e1.setLastName("Kumar");

    session.save(e1);
    t.commit();
    System.out.println("Successfully saved");
    factory.close();
    session.close();

}
}
You can also try this code with Online Java Compiler
Step 6: Run the application
Before running the application, determine that the directory structure is like this.

Click the StoreData - Run As - Java Program option in the context menu to launch the hibernate application.
Frequently Asked Questions
Describe the hibernate mapping file.
The hibernate mapping file defines the entity bean fields and database table column mappings. We know that JPA annotations can be used for mapping, but there are occasions when using third-party classes prevents us from using annotations, in which case an XML mapping file can be helpful.
What is hibernate configuration file?
Database-specific configurations are contained in the Hibernate configuration file, also used to initialize the SessionFactory. In the hibernate configuration XML file, we supply JNDI resource information or database credentials. Dialect information, which lets Hibernate know the type of database and the specifics of the mapping file or class, is one of the configuration file's other crucial components.
SessionFactory for Hibernate is thread-safe?
SessionFactory's internal state is immutable, making it thread-safe. Several threads can access it at once to obtain Session instances.
What does the merge() method in Hibernate Session do?
Although this method creates a copy from the provided entity object and returns it, Hibernate, the merge can be used to update already-existing information. While the supplied object is not tracked, the returned object is a persistent context component.
Conclusion
Greetings on completing the blog! This blog went into great detail about hibernate annotations, including its setup and configuration.
If you want to explore more blogs on this topic, please follow these blogs especially curated for readers like you - JDBC, JDBC Connection, Guide to ORM, Spring Boot, JDBC Hibernate Interview Questions.
Please refer to our guided pathways on Code studio to learn more about DSA, Competitive Programming, JavaScript, System Design, etc. Enroll in our courses, and use the accessible sample exams and questions as a guide. For placement preparations, look at the interview experiences and interview package.
Please do upvote our blogs if you find them helpful and informative!
Happy Learning!


 9+ registered

