


Introduction
A Java library called JavaFX is used to create desktop and Rich Internet Applications (RIA). The JavaFX-built apps can be used to operate on desktop, mobile, and web platforms.
In this article, we will see about the JavaFX Sliders. Sliding a handle to the desired point that corresponds to the desired value, the JavaFX Slider control provides the mechanism for the user to choose a value within a specified range. We will study more about it in detail in this article.
JavaFX Slider
A Slider is a JavaFX Control that displays a continuous or discrete range of acceptable numeric values and enables user interaction. The user slides a knob on a vertical or horizontal bar to indicate the desired value when using a slider. Tick marks and labels are added to a slider to show the intervals along the bar.
The JavaFX class javafx.scene.control.Slider is used to represent the JavaFX Slider.
Class's constructors
- Slider(): A default slider instance is created.
- Slider(double min, double max, double value): Creates a Slider control with the specified current value, slider min, and slider max values.
The slider's three primary variables are min, max, and value. The value must always fall inside the boundaries of the min and max values. The min should never be more than the max. While max defaults to 100, min defaults to 0.
Methods Used
The following table depicts the methods used by this control.

Example
Program to implement the Slider Class
The following steps are followed:
- A group and scene are created.
- The scene should be included in the frame.
- Create a Slider next and include it in the frame.
-
Launch the program.
SlidersFX.java:
//package name
package slidersfx;
// Implementing the Slider Class
import javafx.application.Application;
import javafx.scene.Group;
import javafx.scene.Scene;
import javafx.scene.control.Slider;
import javafx.stage.Stage;
public class SlidersFX extends Application {
    public void start(Stage stage)
    {
        // creating the group
        Group root = new Group();
        Scene scene = new Scene(root, 400, 150);

        // set the Scene to stage
        stage.setScene(scene);

        // set the title for the frame
        stage.setTitle("Slider Example");

        // creating the slider
        Slider slider = new Slider();

        // adding the slider to frame
        root.getChildren().add(slider);
        stage.show();
    }
    // main Method
    public static void main(String[] args)
    {
        // launching the application
        launch(args);
    }
}
In this example, the Slider instance is created using the first constructor we studied above, i.e., Slider slider = new Slider () statement above.
Output:

Using TickMarks and TickLables
The following steps are followed:
- The group and scene are created.
- Insert the frame with the scene.
- Make a Slider with the minimum, maximum, and value defined.
- Labels and marks are then enabled.
- Specify the value for MajorTickUnit.
-
Display the Slider after adding it to the frame.
SlidersFX.java:
// package name
package slidersfx;
import javafx.application.Application;
import javafx.scene.Group;
import javafx.scene.Scene;
import javafx.scene.control.Slider;
import javafx.stage.Stage;
public class SlidersFX extends Application {
public void start(Stage stage)
{
Group root = new Group();
// creating a Scene
Scene scene = new Scene(root, 400, 150);
// adding the Scene to the frame
stage.setScene(scene);
// setting the title of the frame
stage.setTitle("Slider Example");
// A slider is created
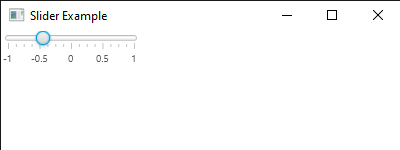
Slider slider = new Slider(-1, 1, -0.5);
// marks are enabled
slider.setShowTickMarks(true);
// Labels are enabled
slider.setShowTickLabels(true);
// setting values for Major tick unit
slider.setMajorTickUnit(0.50f);
// setting the value of the property blockIncrement
slider.setBlockIncrement(0.1f);
root.getChildren().add(slider);
// displaying
stage.show();
}
// main method
public static void main(String[] args)
{
// Launching the application
launch(args);
}
}
In this example, the instance of the Slider is created using the second constructor we studied above, i.e., Slider slider = new Slider(-1, 1, -0.5) statement above, where -1 and 1 specify the boundary and -0.5 specifies the position from which the slider pointer displays.
Output:
Using the changeListener
The following steps are followed:
- Build a Label and choose the text's color.
- The maximum and minimum values for the slider are set.
- Turn on TickMarks and TickLabels.
- Set the blockIncrement property's value. The distance that the thumb goes when a user clicks on the track is determined by the setBlockIncrement() method.
- Add a ChangeListener so that whenever you move the Slider, the label will update to reflect the new contrast value.
- Add a VBox to the frame after creating it.
- Add a scene to the frame.
-
Launch the application at the end.
SlidersFX.java
// package name
package slidersfx;
// Slider Class
import javafx.application.Application;
import javafx.beans.value.ChangeListener;
import javafx.beans.value.ObservableValue;
import javafx.geometry.Insets;
import javafx.scene.Scene;
import javafx.scene.control.Label;
import javafx.scene.control.Slider;
import javafx.scene.layout.VBox;
import javafx.scene.paint.Color;
import javafx.stage.Stage;
 public class SlidersFX extends Application {
    public void start(Stage stage)
    {
        // creating the label
        Label label = new Label("Select the Contrast");
        Label text = new Label(" ");

        // setting the color of the text
        text.setTextFill(Color.PURPLE);

        // creating the slider
        Slider slider = new Slider(0,100,50);

        // TickLabels and Tick Marks are enabled
        slider.setShowTickLabels(true);
        slider.setShowTickMarks(true);
         slider.setBlockIncrement(5);

        // Listener is added to value property.
        slider.valueProperty().addListener(
             new ChangeListener<Number>() {
            public void changed(ObservableValue <? extends Number >
                      observable, Number previousValue, Number rangeValue)
            {
                text.setText("Value of Contrast: " + rangeValue);
            }
        });
        // creating a VBox
        VBox root = new VBox();
        root.setPadding(new Insets(25));
        root.setSpacing(10);
        root.getChildren().addAll(label, slider, text);
        stage.setTitle("Slider Example");

         // creating Scene and then adding it to the frame
        Scene scene = new Scene(root, 400, 200);
        stage.setScene(scene);
        stage.show();
    }
    // main method
    public static void main(String[] args)
    {
        // Launching the Application
        Application.launch(args);
    }
}
Output:
Initially, the output is like this:

After changing the slider's position:


 9+ registered

