The syntax for message flashing
The flash() takes two parameters: Message and Category. A message is a piece of text that is shown to the user. It renders exactly as written, with no modifications. The category is not compulsory, but it is beneficial because it identifies the message kind, such as error, warning, etc. Like so:
flash(message, category)
The messages are generated using the Flask module's flash() method in the Flask script. These messages must be collected from the session in the template. In the HTML template, the method get_flashed_messages() is used for this purpose.
The get_flashed_messages() takes two parameters: with_category and category_filter. The with_category is utilised if the category is stated in the message, but it is not essential.
get_flashed_messages(with_categories, category_filter)
Types of message flashing
First configure the main.py of your Flask application file. This will be common across all the message flashing examples:
from  Flask import Flask
app = Flask(__name__)
app.secret_key = "secret key"
Now, let us have a quick look at the different types of flash messages:
Simple Flash
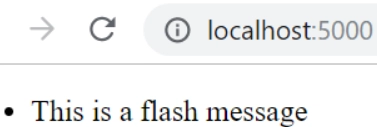
We put a simple message into flash to render a simple template.
main.py
@app.route('/')
def app_session():
  flash('This is a flash message')
  return render_template('template.html')
template.html
Use the code below to retrieve message or feedback from flash simply into the template file and display it. In the below code snippet, the important part is get_flashed_messages() that retrieves all messages from flash.
{% with messages = get_flashed_messages() %}
 {% if messages %}
  <ul>
  {% for message in messages %}
    <li>{{ message }}</li>
  {% endfor %}
  </ul>
 {% endif %}
{% endwith %}
Flash with Category
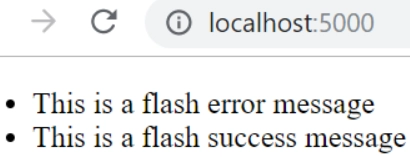
It is possible to provide a category when flashing a message. The default category if nothing is provided is the message.
main.py
@app.route('/')
def app_session():
  flash('This is a flash error message', 'error')
  flash('This is a flash success message', 'success')
  return render_template('template.html')
template.html
In the below code snippet, the get_flashed_messages() that retrieves all messages from flash. The categorical flash messages could be retrieved in the following way:
<div>
  {% with messages = get_flashed_messages(with_categories=true) %}
    {% if messages %}
    <ul>
    {% for category, message in messages %}
  <li class="{{ category }}">{{ message }}</li>
    {% endfor %}
    </ul>
    {% endif %}
  {% endwith %}
</div>
Filter message
Optionally you can pass a list of categories which filters the results of get_flashed_messages(). This is useful if you wish to render each category in a separate block.
main.py
@app.route('/')
def app_session():
  flash('This is a flash error message', 'error')
  flash('This is a flash success message', 'success')
  return render_template('template.html')
template.html
We filter messages which have category error.
<div>
  {% with errors = get_flashed_messages(category_filter=["error"]) %}
    {% if errors %}
    <ul>
    {% for msg in errors %}
      <li>{{ msg }}</li>
    {% endfor %}
    </ul>
    {% endif %}
  {% endwith %}
</div>

Login example with message flashing
Let us have a look at a typical login example for message flashing:
index.html
<html>
<head>
	<title>home</title>
</head>
<body>
 	{% with messages = get_flashed_messages() %}
 	{%  if  messages %}
 	{%  for  message  in  messages %}
 	<p>{{ message }}</p>
 	{% endfor %}
 	{% endif %}
 	{% endwith %}
 	<h3>Welcome</h3>
 	<a href = "{{ url_for('login') }}">login</a>
</body>
</html>
login.html
<html>
<head>
 	<title>login</title>
</head>
<body>
 	{%  if  error %}
 	<p> Error : {{error}}</p>
 	{% endif %}
 	<form method = "post" action = "/login">
 	<table>
 	<tr><td>Email</td><td><input type = 'email' name = 'email'></td></tr>
 	<tr><td>Password</td><td><input type = 'password' name = 'pass'></td></tr>
 	<tr><td><input type = "submit" value = "Submit"></td></tr>
 	</table>
 	</form>
</body>
</html>
main.py
The template (index.html) shown at the URL "/" contains the code for flashing the message (if any). The user is redirected to the URL /login when they click the link login. The template login.html is displayed on the next page, prompting the user to enter their email address and password. If the user enters anything other than "aaaaa" as a password, the application will not be able to login and the message will be flashed (Error: Invalid credentials).
from  Flask import *
app = Flask(__name__)
app.secret_key = "abc"

@app.route('/')
def home():
	return render_template("index.html")

@app.route('/login',methods = ["GET","POST"])
def  login():
  error = None;
  if  request.method == "POST":
    if  request.form['pass'] != 'aaaaa':
		error = "invalid password"
    else :
		flash("you are successfuly logged in")
      	return  redirect(url_for('home'))
    return  render_template('login.html',error=error)

if  __name__ == '__main__':
	app.run(debug = True)

Before the login link click
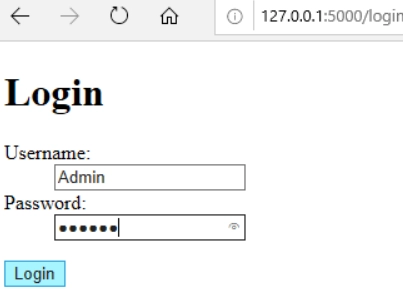
Login page
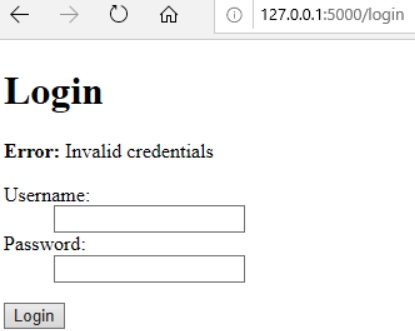
Message flashing when the wrong password is entered
Want to learn about , PHP For Loop click here
FAQs
-
What is equivalent to message flashing in javascript and python?
Alert boxes provided in JavaScript and dialog box or message box in Python are used for providing information messages to the user like flash() in Flask.
-
Is Flask frontend or backend?
There is just one "front end" language in web development, and that is JavaScript (and things compiled to JavaScript, like TypeScript). Everything else is "back end" because it runs on a server rather than in the browser. The back end is Flask, which is written in Python.
-
In Flask, what does Flash () do?
In the flask, the flash() method is used to generate informational messages. It creates a message in one view and renders it to a function called next in a template view. To put it another way, the flask module's flash() method sends the message to the next request, which is an HTML template.
Key Takeaways
From this article, we learned about message flashing in Flask, why we use it, its syntax, its types, and its practical use in coding (login example).
But this is not enough; you need something extra to excel in web development truly. If you want to learn more about web development, you can read our articles or take our highly curated Web Development course.
Recommended reading:
Bootstrap


 9+ registered

