What is Inheritance Mapping?
Inheritance is an object-oriented programming feature that facilitates the developers to inherit the properties of a parent class in the child class. The inheritance hierarchy in hibernate is specified in the tables of the database. This is called inheritance mapping.
To learn more, visit What is Inheritance Mapping? - Coding Ninjas Coding Ninjas Studio.
There are three types of inheritance mapping in hibernate. They are:
-
Table per Hierarchy: In this type, one table is used for both the parents and the child classes. The objects of the parent and the child classes are stored in a single table with the help of a discriminator column. The discriminator column is an extra column added to identify the subclass of an object in the table. To learn more, visit Table Per Hierarchy - Coding Ninjas Coding Ninjas Studio.
-
Table per concrete class: In this type, separate tables are used to store the objects of parent and child classes in the database. Multiple tables are created, one for each class. Table per concrete class uses the concept of overriding. It specifies that the attributes of the parent class are overridden in the child classes. To learn more, visit TPC Using Annotation | Hibernate - Coding Ninjas Coding Ninjas Studio.
- Table per subclass: In this type, separate tables are used for parent and child classes. One table for each class. The tables are linked with the help of primary and foreign keys. The primary key in a table is a set of attributes that uniquely identify a record in a table. The foreign key is an attribute in one table that points to the primary key of another table.
Let us now discuss the Table Per Subclass method of inheritance mapping with an example.
Table per Subclass
Table per subclass is one of the inheritance mapping strategies in hibernate. In this type of inheritance mapping, the tables are created separately for parent and child classes.
With Table Per Subclass, primary and foreign keys connect subclass-mapped tables to parent class-mapped tables. A primary key is an attribute or a set of attributes uniquely identifying a record in the database. A foreign key is an attribute or a set of attributes that link two tables together. To learn more, visit Keys in DBMS - Coding Ninjas Coding Ninjas Studio.
Consider the below inheritance hierarchy.
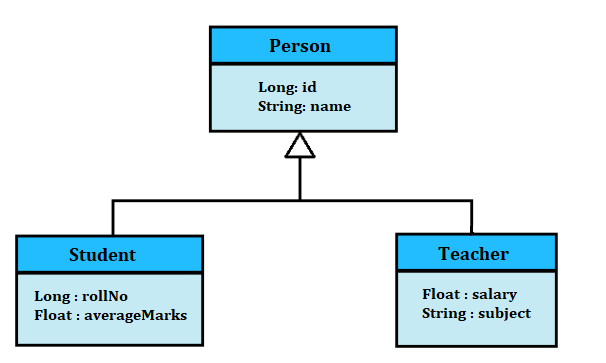
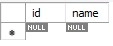
In the above example, The Person class is the parent class with attributes - id and name. The Person class has two child classes - Student and Teacher.
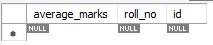
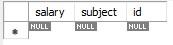
The Student class has two attributes - rollNo and averageMarks. The Teacher class has attributes - salary and subject. Both the child classes have an id attribute that links the child classes to the parent classes in the database tables.
Since we are working with the table per subclass strategy, three tables will be created in the database. One for each class.
The Table per subclass uses the concept of primary and foreign keys to link the tables and maintain the inheritance mapping. So, the Person table will have the id attribute as the primary key. The id attribute is linked to the Student and Teacher class as foreign keys.
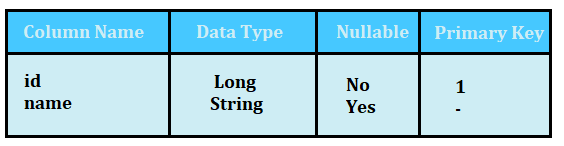
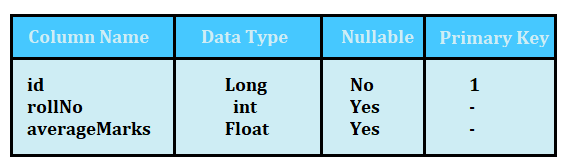
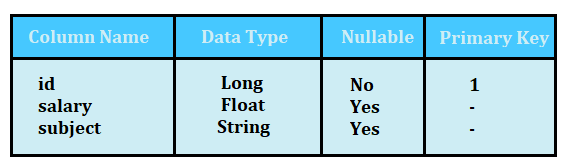
Following is the structure of the three tables created in the database.
Person Table
Student Table
Teacher Table
Let’s us now understand how it is actually done in hibernate. To start, you should have IntelliJ IDEA installed on your system. IntelliJ is an integrated development environment used for developing computer software written in JVM-based languages like Java, Groovy, and Kotlin. You can download IntelliJ from jetbrains.com and get started.
We are going to use the Spring application framework of Java in this example. Spring application Framework works as an infrastructure support for developing Java applications. It is a lightweight framework.
We will also need some dependencies in our project. Dependencies help in connecting the external libraries and functionalities to your project. Instead of adding the dependencies manually, we can use the Spring initializr to generate a project with the required dependencies.
The Spring intializr is a web-based tool that helps in generating Spring boot applications with required dependencies.
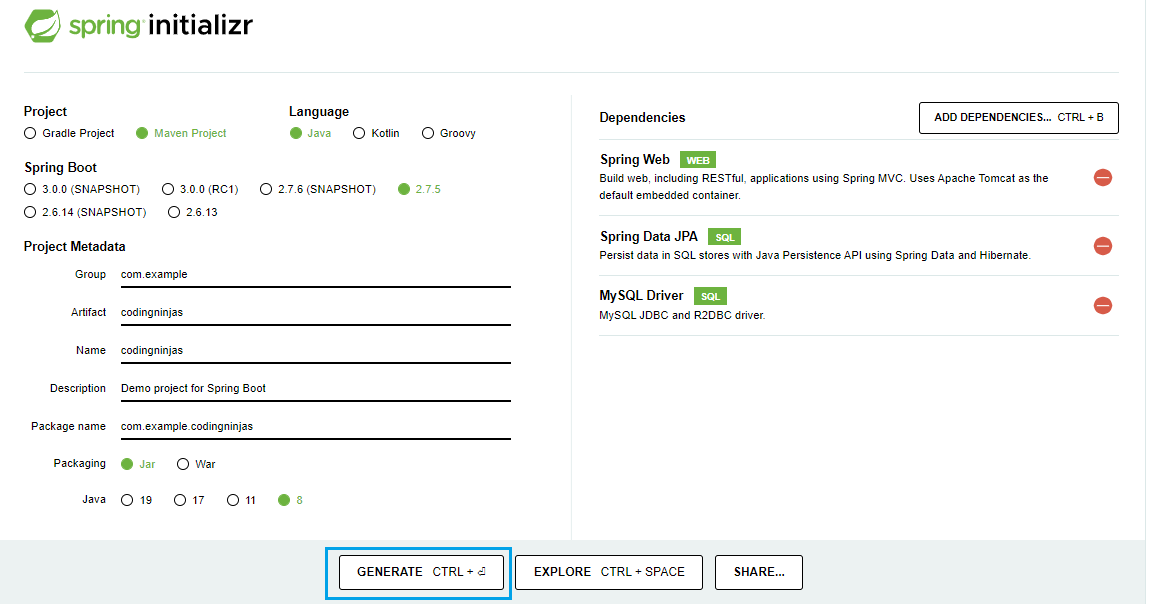
Perform the below steps to download a zip file of your Spring project with dependencies.
-
Visit https://start.spring.io/.
- Select Maven for Project and Java for the language. Fill in other detail and select the Java version installed in your system.
- Add Spring Web, Spring Data JPA, and MySQL Driver dependencies.
- Click on Generate or press Ctrl + Enter.
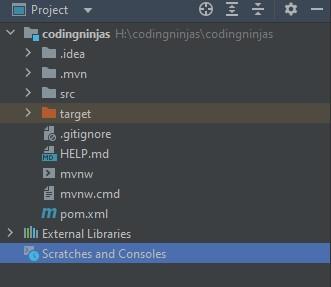
After this, a zip file will be downloaded with all the dependencies. You will not require to add dependencies manually to your Spring application.
Unzip the downloaded file to a directory and Open the project file in IntelliJ IDEA. You will find the below files loaded in the project.
Now the next step is to connect the MySQL database. To do so, you will need to create a database and a user and provide all the necessary permissions to the user.
To do so, open MySQL workbench and run the following commands:
create database codingninjas;
create user 'teeshagoyal'@'%' identified by 'admin';
grant all on codingninjas.* to 'teeshagoyal'@'%';
In the above commands, codingninjas is the database name, teeshagoyal is the user name, and admin is the password. You can set these values according to your needs.
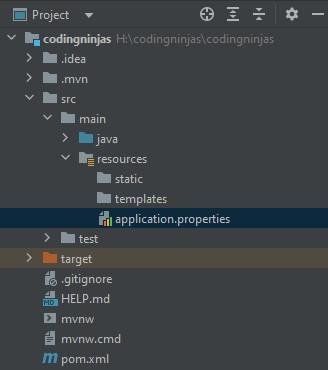
Now that your database and user account is ready. Go back to IntelliJ and open the application.properties file.
Add the below commands to the application.properties file. These commands will connect your Spring application to your MySQL database. You have to provide the database's name, the user's name, and the password.
spring.jpa.hibernate.ddl-auto=update
spring.datasource.url=jdbc:mysql://${MYSQL_HOST:localhost}:3306/codingninjas
spring.datasource.username=teeshagoyal
spring.datasource.password=admin
spring.datasource.driver-class-name=com.mysql.cj.jdbc.Driver
#spring.jpa.show-sql: true
Now we will create the classes. We will create a package called entities and create classes inside the package. A package is basically a collection of java programs. We have given the name entities because the classes are going to act as entities in the database. An entity is a set of similar data objects.
We will use the @Entity annotation when declaring the classes. Annotations contain the data about the programs. They are like metadata. The @Entity annotation specifies that the class is an Entity in the database.
We will also use @Inheritance(strategy = InheritanceType.JOINED). The @Inheritance annotation is used to specify the type of inheritance mapping you will be using in your project. The InheritanceType.JOINED specifies that the type is Table per Subclass. It indicates that you will create a separate table for each class and use the concept of keys to link the parent class with the child classes.
Let us see the code for all three classes.
Person.java File
package com.example.codingninjas.entities;

import javax.persistence.*;

@Entity
@Inheritance(strategy = InheritanceType.JOINED)
public class Person {

    @Id
    @GeneratedValue(strategy= GenerationType.AUTO)
    private Long id;

    private String name;

    public Long getId() {
        return id;
    }

    public void setId(Long id) {
        this.id = id;
    }

    public String getName() {
        return name;
    }

    public void setName(String name) {
        this.name = name;
    }

    @Override
    public String toString() {
        return "Person{" +
                "id=" + id +
                ", name='" + name + '\'' +
                '}';
    }
}

You can also try this code with Online Java Compiler
Student.java File
package com.example.codingninjas.entities;

import javax.persistence.Entity;
import javax.persistence.PrimaryKeyJoinColumn;

@Entity
@PrimaryKeyJoinColumn(name = "id")
public class Student extends Person{

    private Long rollNo;

    private Float averageMarks;

    public Long getRollNo() {
        return rollNo;
    }

    public void setRollNo(Long rollNo) {
        this.rollNo = rollNo;
    }

    public Float getAverageMarks() {
        return averageMarks;
    }

    public void setAverageMarks(Float averageMarks) {
        this.averageMarks = averageMarks;
    }

    @Override
    public String toString() {
        return "Student{" +
                "rollNo=" + rollNo +
                ", averageMarks=" + averageMarks +
                '}';
    }
}
You can also try this code with Online Java Compiler
Teacher.java File
package com.example.codingninjas.entities;

import javax.persistence.Entity;
import javax.persistence.PrimaryKeyJoinColumn;

@Entity
@PrimaryKeyJoinColumn(name = "id")
public class Teacher extends Person{

    private Float salary;

    private String subject;

    public Float getSalary() {
        return salary;
    }

    public void setSalary(Float salary) {
        this.salary = salary;
    }

    public String getSubject() {
        return subject;
    }

    public void setSubject(String subject) {
        this.subject = subject;
    }

    @Override
    public String toString() {
        return "Teacher{" +
                "salary=" + salary +
                ", subject='" + subject + '\'' +
                '}';
    }
}
You can also try this code with Online Java Compiler
It is good practice to create getter and setter methods. It is also a good practice to create a toString method in each class to specify a clean way of displaying the attributes of an object.
The next thing we are going to do is create repositories. We will create another package with a repositories name and create one repository for each class. Repositories have various defined methods that you can use to perform simple operations like CRUD(Create, read, update, delete) operations. There are many more operations you can perform by creating repositories.
We are using the SpringJPA dependency. Spring Data JPA or SpringJPA is used to reduce the efforts required in accessing and managing data layers. It simplifies the implementational efforts by providing a simple way of accessing data.
So, when writing repositories, we will use JpaRepository<User, Integer>. It helps create repositories. Following is the code required to create repositories.
PersonRepository.java File
package com.example.codingninjas.repositories;

import com.example.codingninjas.entities.Person;
import org.springframework.data.jpa.repository.JpaRepository;

public interface PersonRepository extends JpaRepository<Person, Integer> {
}
You can also try this code with Online Java Compiler
StudentRepository.java File
package com.example.codingninjas.repositories;

import com.example.codingninjas.entities.Student;
import org.springframework.data.jpa.repository.JpaRepository;

public interface StudentRepository extends JpaRepository<Student, Integer> {
}
You can also try this code with Online Java Compiler
TeacherRepository.java File
package com.example.codingninjas.repositories;

import com.example.codingninjas.entities.Teacher;
import org.springframework.data.jpa.repository.JpaRepository;

public interface TeacherRepository extends JpaRepository<Teacher, Integer>{
}
You can also try this code with Online Java Compiler
Now we will create the controllers. We cannot use repositories directly to process the HTTP requests, so we will create controllers. In the controller class, we will use the repository class objects to perform the necessary actions.
Controllers are responsible for handling HTTP requests. We will use the @RestController annotation in the controller classes. The @RestController annotation is used to mark a class as a request handler. We will also use the @Autowiring annotation. This annotation is used to handle the data.
We will use the @PostMapping annotation because we are handling the incoming requests to the server. This annotation helps in handling the HTTP POST requests. The POST request is the type of request where the data is sent from the user to the server. It may be a request to create or update a resource.
Finally, we will use the @ResponseBody annotation. This annotation specifies that the returned object is automatically formatted in JSON form and can be sent as a response to the received request. We are saving the new object in the database and returning the created object in the response body.
Following are the controller classes for our project.
PersonController.java File
package com.example.codingninjas.controllers;

import com.example.codingninjas.entities.Person;
import com.example.codingninjas.repositories.PersonRepository;
import org.springframework.beans.factory.annotation.Autowired;
import org.springframework.lang.NonNull;
import org.springframework.web.bind.annotation.*;

@RestController
public class PersonController {
    @Autowired
    private PersonRepository personRepository;

    @PostMapping(path="/addPerson") // Map ONLY POST Requests
    public @ResponseBody Person addNewPerson (@RequestBody Person person) throws Exception {
        // @ResponseBody means the returned String is the response, not a view name

        return personRepository.save(person);
    }
}
You can also try this code with Online Java Compiler
StudentController.java File
package com.example.codingninjas.controllers;

import com.example.codingninjas.entities.Student;
import com.example.codingninjas.repositories.StudentRepository;
import org.springframework.beans.factory.annotation.Autowired;
import org.springframework.lang.NonNull;
import org.springframework.web.bind.annotation.*;

import java.util.regex.Pattern;

@RestController
public class StudentController {
    @Autowired
    private StudentRepository studentRepository;


    @PostMapping(path="/addStudent") // Map ONLY POST Requests
    public @ResponseBody Student addNewStudent (@RequestBody Student student) throws Exception {
        // @ResponseBody means the returned String is the response, not a view name

        return studentRepository.save(student);
    }
}
You can also try this code with Online Java Compiler
TeacherController.java File
package com.example.codingninjas.controllers;

import com.example.codingninjas.entities.Teacher;
import com.example.codingninjas.repositories.TeacherRepository;
import org.springframework.beans.factory.annotation.Autowired;
import org.springframework.lang.NonNull;
import org.springframework.web.bind.annotation.*;

@RestController
public class TeacherController {
    @Autowired
    private TeacherRepository teacherRepository;


    @PostMapping(path="/addTeacher") // Map ONLY POST Requests
    public @ResponseBody Teacher addNewTeacher (@RequestBody Teacher teacher) throws Exception {
        // @ResponseBody means the returned String is the response, not a view name

        return teacherRepository.save(teacher);
    }
}
You can also try this code with Online Java Compiler
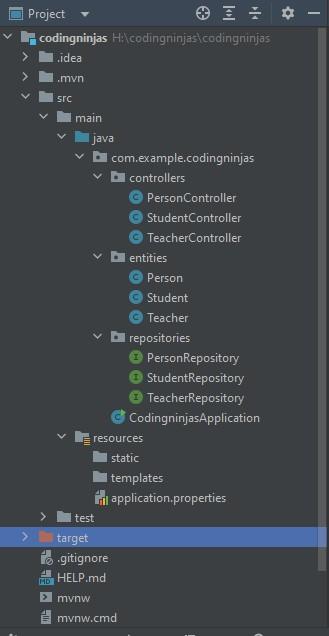
The project structure will look like this:
Now, you can also see the CodingninjasApplication.java file. This was loaded from the Spring Initializr at the beginning. When you run this file and check your database. You will find that the three tables are now created in the database.

You can also see the structure of each table created in the database.
Person Table
Student Table
Teacher Table
Frequently Asked Questions
What does Hibernate's table per concrete class mean?
The Table per concrete class in Hibernate is a type of inheritance mapping. In this type of inheritance mapping, the tables are created separately for each category with no relation.
What is Hibernate?
Hibernate is an open-source, high-performance, object-relational mapping tool. It is used to store and query persistent data for Java applications. It makes it easier for the developers to map the objects written in any object-oriented language to the tables in the database.
What is table per hierarchy inheritance mapping?
This type uses a single table for parent and child classes. The objects of the parent and the child classes are stored in a single table with the help of a discriminator column. The discriminator column is an extra column added to identify the subclass of an object in the table.
What is @ResponseBody annotation?
This annotation specifies that the returned object is automatically formatted in JSON form and can be sent as a response to the received request.
What are primary and foreign keys?
A primary key is an attribute or a set of attributes to uniquely identify a record in the database. A foreign key is an attribute or a set of attributes that link two tables together.
Conclusion
This article discussed Table Per Subclass Inheritance Mapping strategy in Hibernate. To learn more about hibernate, visit Hibernate | Learn & Practice from Coding Ninjas Studio.
To learn about inheritance mapping, visit What is Inheritance Mapping? - Coding Ninjas Coding Ninjas Studio.
I hope you would have gained a better understanding of these topics now!
Are you planning to ace the interviews with reputed product-based companies like Amazon, Google, Microsoft, and more?
Attempt our Online Mock Test Series on Coding Ninjas Studio now!
Happy Coding!


 9+ registered

