Do you think IIT Guwahati certified course can help you in your career?
Introduction
This blog will help to understand the basic concepts of modules in Bolt. Bolt is an orchestration tool to automate the configuration of devices. You can install Bolt on any operating system and automate the servers and applications.
Bolt can deploy applications, debug servers, patch and upgrade systems, or halt and restart services. This blog will guide you about modules in bolt, module dependency, and different ways to install these modules.
What are Modules in Bolt?
In general, modules are a part of a program containing one or more components and can be added and removed from the system easily. The modules in Bolt are directories containing puppet codes. Modules include plans and tasks that help in managing applications. You can install these modules in Bolt and use them in your workflows.
You can also create your own plans and tasks in Bolt and use them later via these modules in your program. Modules are dependent on one another for proper working. Let's discuss the dependency management of modules in Bolt.
Dependency Management
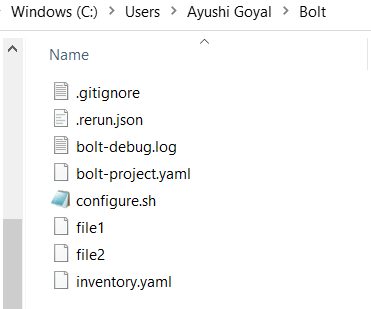
When you install a module in Bolt, it automatically adds all the modules on which it depends. These modules and their dependencies will be added under the module key section of the configuration file (bolt-project.yaml file). Go to the folder where Bolt is installed to view this configuration file. You will see the following files, out of which one is the 'bolt-project.yaml' file.
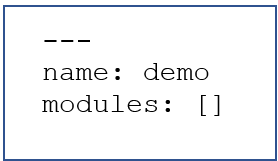
By default, the configuration files look like this:
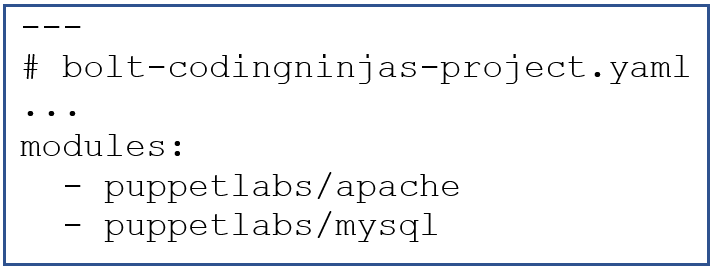
For example: If we create a project with the name 'bolt-codingninjas' and add mysql and apache modules, then the configuration file will be:
Bolt installs all the dependencies like translate, stdlib, concat, etc, and the corresponding puppet file for the project will contain:
# Puppetfile
...
moduledir '.modules'
mod 'puppetlabs/apache', '5.6.0'
mod 'puppetlabs/puppetserver_gem', '1.1.1'
mod 'puppetlabs/resource_api', '1.1.0'
mod 'puppetlabs/translate', '2.2.0'
mod 'puppetlabs/stdlib', '6.5.0'
mod 'puppetlabs/mysql', '10.8.0'
mod 'puppetlabs/concat', '6.2.0'
Module Path
There is a list of directories where Bolt search for content. It is called the modulepath. Bolt obtains content from-
The current project.
Any modules that are present in the configurable modules directory. By default, that directory is modules/.
The module directories that are managed by Bolt (.modules).
Any modules that come with Bolt.
The modulepath directory accepts multiple directories like an array. When you want to add, remove or modify any directory from Bolt's module path, then you can add, remove, or change the path of that directory in your 'bolt-project.yaml' file.
The command used to list all the directories and modules loading from the current module path is:
bolt module show (*nix shell)
Get-BoltModule (in power shell)
Compatibility with Bolt Versions
Module dependency management was introduced in Bolt 2.23.0 version. And switching to this version, you may find past projects that no longer work as expected. The changes introduced are:
Install puppet enterprise
As the modules in Bolt are automatically added to the Puppet file, you have to install puppet enterprise if you are using this feature.
Migrating a Project
It becomes easy to migrate a file using the module dependency feature. You can use the 'migrate' command that provides the following features:
Upgrade projects to use module dependency management features.
Upgrade projects to use the 'bolt-project.yaml' configuration file instead of the 'bolt.yaml' file.
Update inventory files.
The command used to migrate the projects using the 'migrate' command of the module dependency feature is:
bolt project migrate
Installing Modules
We can use the command line to implement the following tasks.
Create a project using pre-installed modules.
Add a Puppet Forge module.
Install modules associated with the bolt project.
Update project modules.
Create a Project
You can create a new project either by using pre-installed modules or installing new modules and dependencies using the bolt command line. Bolt installs the latest versions of all the modules and their dependencies.
For instance, if we want to turn the current directory into a project named 'exampleCodingNinjas_project' which has puppetlabs/mysql modules installed, the command used will be:
In Nix shell
bolt project init examplecodingninjas_project --modules puppetlabs-mysql

In Power Shell
New-BoltProject -Name examplecodingninjas_project -Modules puppetlabs-mysql
Install A Module To An Existing Project
To install a new module to an existing project, ensure that the project is configured with dependency management, i.e., the module key must be present in the 'bolt-project.yaml' file. If not, then migrate your project. You can add a forge module and dependencies to a current project using the command:
In Nix Shell
bolt module add <module_name>

In Power Shell
Add-BoltModule -Module <module_name>
Bolt will add these modules and keep all the pre-installed modules in the same version until a conflict occurs. It might be updated to a newer version in case of any conflict.
Install Associated Modules with Your Bolt Project
The following code comes in handy while installing the modules associated with a bolt project.
In Nix shell
bolt module install

In Power Shell
Install-BoltModule
Forcible Installation
Avoid or be careful while manually modifying your configuration file or puppet file. Because while installing the modules, bolt compares the module specification in both these files to check if the puppet file is managed by bolt. If found some missing specifications, then the bolt raises an error containing:
Puppetfile at /<project_name>/Puppetfile does not include modules that
satisfy the following specifications:
- name: puppetlabs-ruby-task-helper
This might not be a Puppetfile managed by Bolt.
In this case, you can forcible overwrite the module specification using the
following code:
In Nix shell
bolt module install --force Copied!

In Power Shell
Install-BoltModule -Force
Manual Module Specification
Sometimes you need to specify a module in the project configuration file manually. In this case, you can list the module specification under the module key. The key specifications of a forge module include:
Full name of the module
Version requirement (optional)
Resolve factor of whether to resolve the module's dependencies (optional)
For example: To install the apache module of version 5.0.0/5.x along with resolving the specification, will be like this:
It is also possible to set a proxy that is only used when installing Forge modules. To do the same, set the proxy key under the forge section of the module-install option:
If you intend to set an authorization token for installing Forge modules, set the authorization_token key under the forge section of the module-install option. When you set the authorization_token key, you must also take care of the baseurl key.
There is a list of directories where Bolt search for content. It is called the modulepath.
What is the use of Modules in Bolt?
Modules solve use cases and manage applications. Modules include helpful plans and tasks. They also allow to share of custom bolt tasks or utilize the bolt content programmatically.
What does puppetlabs/ruby_task_helper do?
The puppetlabs/ruby_task_helper serves as a helper for writing tasks in ruby.
What is the extension for plans in Bolt?
Plans must end in the .pp or .yaml extensions.
What are some local modules available in bolt?
Aggregate, Canary, puppert_connect, and puppetdb are some local modules.
Conclusion
This blog discussed the concept of modules in the bolt. It also discussed the task of dependency management.
For more information on Bolt, you can refer to the following articles-


 8+ registered

