Implementation
In the below implementation we will have a look at three different programs to create a grid layout which divides the container into a grid of cells called rows and columns and the number of the grid of cells and columns can be adjusted as per the need of the user. In the first program, we will look into the usage of a parameterless constructor while in the last two programs we will be defining the number of rows and columns and also the horizontal and vertical gaps between the cells respectively.
GridLayout()
In this program, we will be implementing an empty constructor with one column per component in a single row.
import java.awt.*;
import javax.swing.*;

public class GridLayoutDemo {

  public static void main(String[] args) {
    // constructor
    JFrame frame = new JFrame("Grid Layout");
    frame.setVisible(true);
    frame.setDefaultCloseOperation(JFrame.EXIT_ON_CLOSE);
    frame.setSize(200, 200);
    JPanel panel = new JPanel();

    // creating 4 buttons
    panel.setLayout(new GridLayout());
    JButton button1 = new JButton("1");
    JButton button2 = new JButton("2");
    JButton button3 = new JButton("3");
    JButton button4 = new JButton("4");

    //setting the orientation
    panel.setComponentOrientation(ComponentOrientation.RIGHT_TO_LEFT);
    panel.add(button1);
    panel.add(button2);
    panel.add(button3);
    panel.add(button4);
    frame.add(panel);
  }
}

You can also try this code with Online Java Compiler
Output

GridLayout(int rows, int columns)
In this program, we will implement Constructor with a specified number of rows and columns.
-
Rows: specifies the number of rows
-
Columns: specifies the number of columns
import java.awt.*;
import javax.swing.*;

public class GridLayoutDemo {

  public static void main(String[] args) {
    JFrame frame = new JFrame("Grid Layout");
    frame.setVisible(true);
    frame.setDefaultCloseOperation(JFrame.EXIT_ON_CLOSE);
    frame.setSize(200, 200);
    JPanel panel = new JPanel();

    // setting grid layout of 2 rows and 2 columns
    panel.setLayout(new GridLayout(2, 2));

    // creating 4 buttons
    JButton button1 = new JButton("1");
    JButton button2 = new JButton("2");
    JButton button3 = new JButton("3");
    JButton button4 = new JButton("4");

    panel.setComponentOrientation(ComponentOrientation.LEFT_TO_RIGHT);
    panel.add(button1);
    panel.add(button2);
    panel.add(button3);
    panel.add(button4);
    frame.add(panel);
  }
}
You can also try this code with Online Java Compiler
Output

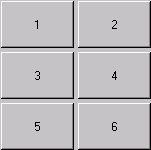
GridLayout(int rows, int columns, int hgap, int vgap)
In this program, we will insert horizontal and vertical gaps between buttons using the parameterized constructor GridLayout(int rows, int columns, int hgap, int vgap).
-
Rows: specifies the number of rows
-
Columns: specifies the number of columns
-
hgap: the gap between each of the columns
-
vgap: the gap between each of the rows
import java.awt.*;
import javax.swing.*;

public class GridLayoutDemo {

  public static void main(String[] args) {
    // constructor
    JFrame frame = new JFrame("Grid Layout");
    frame.setVisible(true);
    frame.setDefaultCloseOperation(JFrame.EXIT_ON_CLOSE);
    frame.setSize(200, 200);
    JPanel panel = new JPanel();

    // setting the grid layout
    // a 2 * 2 grid is created with the horizontal gap 5
    // and vertical gap 10
    panel.setLayout(new GridLayout(2, 2, 5, 10));

    // creating 4 buttons
    JButton button1 = new JButton("1");
    JButton button2 = new JButton("2");
    JButton button3 = new JButton("3");
    JButton button4 = new JButton("4");

    //setting the orientation
    panel.setComponentOrientation(ComponentOrientation.LEFT_TO_RIGHT);
    panel.add(button1);
    panel.add(button2);
    panel.add(button3);
    panel.add(button4);
    frame.add(panel);
  }
}
You can also try this code with Online Java Compiler
Output

Frequently Asked Questions
What is a grid layout class in Java?
It is a layout manager that organizes the components of a container in a rectangular grid.
How do I create a grid in JFrame?
To make a new frame, use the syntax: JFrame frame = new JFrame(); We must ensure that all of the buttons are placed in the grid layout within the constructor method.
What is a layout in Java?
The arrangement of components within the container is referred to as layout. In other words, the components are placed in a certain location within the container. The Layout Manager handles the task of layouting the controls automatically.
Conclusion
In this article, we have extensively discussed the grid layout present inside Java. We have seen different constructors to initialize the grid layout. Also, we have seen various methods available inside the class along with the implementation.
If you think this blog has helped you enhance your knowledge about grid layout and if you would like to learn more, check out our articles Understanding Java, Grid Layout, Introduction to Packages, JDK, and many more in our Library.
Refer to our Guided Path on Coding Ninjas Studio to upskill yourself in Data Structures and Algorithms, Competitive Programming, JavaScript, System Design, and many more! If you want to test your competency in coding, you may check out the mock test series and participate in the contests hosted on Coding Ninjas Studio! But suppose you have just started your learning process and are looking for questions asked by tech giants like Amazon, Microsoft, Uber, etc. In that case, you must look at the problems, interview experiences, and interview bundle for placement preparations.
Do upvote our blogs if you find them helpful and engaging!
Happy Learning!


 8+ registered

