


Introduction
GridLayout is a layout manager that arranges the components of a container in a rectangular grid. One component is placed in each rectangle of the container, which is divided into equal-sized rectangles.
In this article, we will discuss gridlayout in java, the types of grid layout constructors, swing class in java, and examples of grid layout. We will start with brief introduction to gridlayout in java and swing class.
Java Swing
Java Swing is a toolkit for creating a graphical user interface (GUI) in Java that includes a large number of widgets. It's part of the Java Foundation Classes (JFC) and comes with a number of packages for creating Java-rich desktop applications. Swing has built-in controls for displaying HTTP or rich text format, such as trees, image buttons, tabbed windows, sliders, toolbars, color choosers, tables, and text areas (RTF). Swing components are platform-independent because they are developed entirely in Java.
Also read swing component in Java
How to declare the Gridlayout class
Class GridLayout extends Object
Implements LayoutManager, Serializable
Constructor in gridlayout
| CONSTRUCTORS | FUNCTIONS |
| GridLayout() | Produces a grid layout in which each component in a row has one column. |
| GridLayout(int rows, int columns) | Produces a grid layout with the specified rows and columns, but no gaps between them. |
| GridLayout(int rows, int columns, int hgap, int vgap) | Generates a grid with the specified rows and columns, as well as the specified horizontal and vertical gaps. |
Now let’s understand the types of gridlayout constructor with the help of some examples
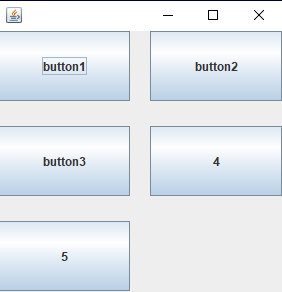
Java GridLayout() constructor
//program to implement the Gridlayout in java with constructor.
import java.awt.*;
import javax.swing.*;

public class GridLayoutExample
{
JFrame frameObj;

// constructor
GridLayoutExample()
{
frameObj = new JFrame();

// creating buttons
JButton BUTTON1 = new JButton("C");
JButton BUTTON2 = new JButton("O");
JButton BUTTON3 = new JButton("D");
JButton BUTTON4 = new JButton("I");
JButton BUTTON5 = new JButton("N");
JButton BUTTON6 = new JButton("G");
JButton BUTTON7 = new JButton("N");
JButton BUTTON8 = new JButton("I");
JButton BUTTON9 = new JButton("N");
JButton BUTTON10 = new JButton("J");
JButton BUTTON11 = new JButton("A");
JButton BUTTON12= new JButton("S");
// we are just trying to making the row count constant.
frameObj.add(BUTTON1);
frameObj.add(BUTTON2);
frameObj.add(BUTTON3);
frameObj.add(BUTTON4);
frameObj.add(BUTTON5);
frameObj.add(BUTTON6);
frameObj.add(BUTTON7);
frameObj.add(BUTTON8);
frameObj.add(BUTTON9);
frameObj.add(BUTTON10);
frameObj.add(BUTTON11);
frameObj.add(BUTTON12);

// setting up the grid layout using the parameterless constructor
frameObj.setLayout(new GridLayout());


frameObj.setSize(500, 500);
frameObj.setVisible(true);
}

// main method
public static void main(String argvs[])
{
new GridLayoutExample();
}
} 
Output

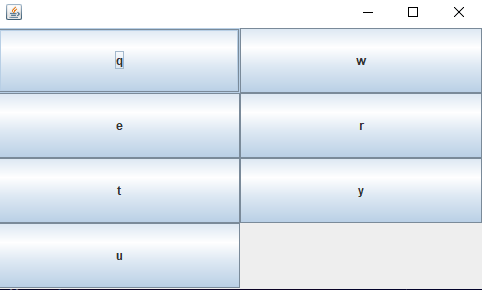
Java GridLayout(int row, int column) constructor
//program to represent Gridlayout in java with parameterised constructor.
import java.awt.*;
import javax.swing.*;
public class GridLayoutExample{
JFrame frame;
GridLayoutExample(){
    //building the frames
    frame=new JFrame();
    JButton button1=new JButton("q");
    JButton button2=new JButton("w");
    JButton button3=new JButton("e");
    JButton button4=new JButton("r");
    JButton button5=new JButton("t");
    JButton button6=new JButton("y");
    JButton button7=new JButton("u");
    frame.add(button1);
    frame.add(button2);
    frame.add(button3);
    frame.add(button4);
    frame.add(button5);
    frame.add(button6);
    frame.add(button7);

    // pasing the grid layout of rows and columns
    frame.setLayout(new GridLayout(4,4));
    frame.setSize(500,300);
    frame.setVisible(true);
}
public static void main(String[] args) {
    new GridLayoutExample();
}
}
Output
Java GridLayout(int row, int column, int hgap, int vgap) constructor
//program to represent Gridlayout in java with parameterised constructor.
import java.awt.*;
import javax.swing.*;

public class GridLayoutExample1
{

JFrame frameObj;

// constructor
GridLayoutExample1()
{
frameObj = new JFrame();

// creating 9 buttons
JButton button1 = new JButton("a");
JButton button2 = new JButton("s");
JButton button3 = new JButton("d");
JButton button4 = new JButton("f");
JButton button5 = new JButton("g");
JButton button6 = new JButton("h");
JButton button7 = new JButton("j");
JButton button8 = new JButton("k");
JButton button9 = new JButton("l");
JButton button10 = new JButton("x");
JButton button11 = new JButton("z");
frameObj.add(button1);
frameObj.add(button2);
frameObj.add(button3);
frameObj.add(button4);
frameObj.add(button5);
frameObj.add(button6);
frameObj.add(button7);
frameObj.add(button8);
frameObj.add(button9);
frameObj.add(button10);
frameObj.add(button11);
// grid layout
// creating a grid with the horizontal gap and vertical gap
frameObj.setLayout(new GridLayout(4, 4, 20, 25));
frameObj.setSize(300, 300);
frameObj.setVisible(true);
}
// main method
public static void main(String argvs[])
{
new GridLayoutExample1();
}
}
Output


 8+ registered

