Do you think IIT Guwahati certified course can help you in your career?
Introduction
One of the first stages in learning JavaFX programming is working with the JavaFX button because it is pretty simple. The button is crucial to your application's success. In JavaFX, there are three different sorts of controls that represent buttons.
In this article, we will cover the fundamental applications of the JavaFX Button. To further comprehend the significance and applications of JavaFX Buttons, we'll look at a few examples.
JavaFX Button
In user interface applications, a button serves as a control that, when clicked, executes the specified action. JavaFX employs buttons to manage how an application behaves when a button is clicked, and action is initiated. Buttons can be different, including graphics, text, and picture buttons.
By instantiating the javafx.scene.control.Button, you may build a Button. You can modify the button's text using the setText() function on the button's class in this package.
How to create a Button?
By instantiating the Button class, a button may be generated. To construct a button object, use the following line.
Button bttn = new Button("My Button");
You can also try this code with Online Java Compiler
An action associated with a button will be carried out when a user clicks it. The event handler handles that matching event. Buttons may be made of text, graphics, or any combination of the three. The class Labeled is an extension of the class Button. In JavaFX, there are various buttons:
Normal Button: A typical push-button
Default Button: A default button is activated when the keyboard key VK_ENTER is pressed.
Cancel Button: A cancel button is activated by the keyboard key VK_ENTER.
Methods in JavaFX Button
Some frequently used JavaFX Button methods are listed below.
Example
A Program to Make a Button and Add it to the Stage
Here we will create a simple button using the Button() function.
//Using a Java programme, add a button to the stage.
import javafx.scene.control.Button;
import javafx.scene.Scene;
import javafx.stage.Stage;
import javafx.scene.layout.StackPane;
import javafx.application.Application;


public class button extends Application {


    public void start(Stage s)
    {
        // set title
        s.setTitle("creating buttons");

        Button b = new Button("New Button");


        // create a stack pane
        StackPane r = new StackPane();


        // add button
        r.getChildren().add(b);


        // create the scene
        Scene sc = new Scene(r, 100, 100);


        // set the scene
        s.setScene(sc);


        s.show();
    }


    public static void main(String args[])
    {
        // launch
        launch(args);
    }
}
You can also try this code with Online Java Compiler
Create a Button and Add an Event Handler using a Java Application.
Now we can try to add an Event Handler to our button to show a message when the button is pressed using Event Handler.
// A button is created by a Java program, and an event handler is added.
import javafx.stage.Stage;
import javafx.scene.Scene;
import javafx.scene.control.Button;
import javafx.application.Application;
import javafx.event.ActionEvent;
import javafx.event.EventHandler;
import javafx.scene.layout.*;
import javafx.scene.control.Label;
public class button_1 extends Application {
public void start(Stage s)
{
// set title for the stage
s.setTitle("creating buttons");
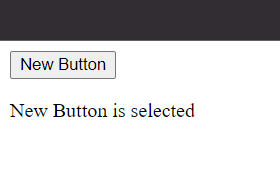
Button b = new Button("New button");
// create a stack pane
TilePane r = new TilePane();
// create a label
Label l = new Label("button is not selected");
// action event
EventHandler<ActionEvent> event = new EventHandler<ActionEvent>() {
public void handle(ActionEvent e)
{
l.setText("New button is selected ");
}
};
// when button is pressed
b.setOnAction(event);
// add button
r.getChildren().add(b);
r.getChildren().add(l);
// create the scene
Scene sc = new Scene(r, 100, 100);
// set the scene
s.setScene(sc);
s.show();
}
public static void main(String args[])
{
// launch
launch(args);
}
}
You can also try this code with Online Java Compiler
Java Program to Create a Button with an Image and Add an Event Handler
On top of the last code, we can also use an image for the button by making a few changes.
// Java Program to create a button with a image and add event handler to it
import javafx.stage.Stage;
import javafx.scene.Scene;
import javafx.application.Application;
import javafx.scene.layout.*;
import javafx.scene.image.*;
import java.io.*;
import javafx.scene.control.Button;
import javafx.event.EventHandler;
import javafx.event.ActionEvent;
import javafx.scene.control.Label
import java.net.*;
public class button_2 extends Application {
    public void start(Stage s) throws Exception
    {
        // set title for the stage
        s.setTitle("creating buttons");
        // create  input stream
        FileInputStream input = new FileInputStream("f:\\codingninjas.png");


        // create  image
        Image i = new Image(input);


        // create  image View
        ImageView iw = new ImageView(i);


        Button b = new Button("", iw);


        // create a stack pane
        TilePane r = new TilePane();


        // create a label
        Label l = new Label("New button is not selected");


        // action ev
        EventHandler<ActionEvent> event = new EventHandler<ActionEvent>() {
            public void handle(ActionEvent e)
            {
                l.setText("New button is  selected ");
            }
        };


        // when button is pressed
        b.setOnAction(event);


        // add button
        r.getChildren().add(b);
        r.getChildren().add(l);


        // create a scene
        Scene sc = new Scene(r, 100, 100);


        // set the scene
        s.setScene(sc);


        s.show();
    }


    public static void main(String args[])
    {
        // launch
        launch(args);
    }
}
You can also try this code with Online Java Compiler
Java program to Create an Alternate Button and the Main Button
Finally, we can also create an alternate button with the Main button having separate event handlers.
// Java program to create a Main button and Alternate button and add event handler to it
import javafx.scene.Scene;
import javafx.application.Application;
import javafx.scene.layout.*;
import javafx.scene.control.Button;
import javafx.scene.control.Label;
import javafx.event.EventHandler;
import javafx.event.ActionEvent;
import javafx.stage.Stage;
public class button_4 extends Application {
// launch the application
public void start(Stage s)
{
// set title for the stage
s.setTitle("creating buttons");
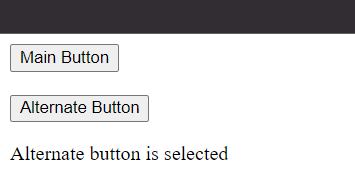
Button b = new Button("Main button");
// set cancel button
b.setCancelButton(true);
Button b1 = new Button("Alternate button");
// set default button
b1.setDefaultButton(true);
// create a stack pane
TilePane r = new TilePane();
// create a label
Label l = new Label("button not selected");
// action event
EventHandler<ActionEvent> event = new EventHandler<ActionEvent>() {
public void handle(ActionEvent e)
{
l.setText(" Main button is selected ");
}
};
EventHandler<ActionEvent> event1 = new EventHandler<ActionEvent>() {
public void handle(ActionEvent e)
{
l.setText(" Alternate button is selected ");
}
};
// when button is pressed
b.setOnAction(event);
b1.setOnAction(event1);
// add button
r.getChildren().add(b);
r.getChildren().add(b1);
r.getChildren().add(l);
// create a scene
Scene sc = new Scene(r, 200, 200);
// set the scene
s.setScene(sc);
s.show();
}
public static void main(String args[])
{
// launch
launch(args);
}
}
You can also try this code with Online Java Compiler
When a JavaFX application user presses a button, a JavaFX button control enables the application to act.
Which class is used to create a JavaFX button?
By instantiating the javafx.scene.control, you may build a Button. Using the setText() function on the button's class in this package, you can modify the button's text.
How does JavaFX determine whether a button has been pressed?
When a button is clicked, the subsequent ActionEvent's getTarget() method can be used to obtain the button object. If the button doesn't have a label text, the button's id, if it was encoded when the button was created, can be used to identify it.
What is event handling in JavaFX?
Using Event Handlers to manage the events produced by Keyboard Actions, Mouse Actions, and numerous other source nodes are made more accessible by JavaFX. In the event bubbling phase, events are handled by event handlers.
How can I modify a button's size in JavaFX?
The minimum and maximum widths that a button may have been set using the setMinWidth() and setMaxWidth() methods. The preferred width of the button is set using the setPrefWidth() function. JavaFX will do so when there is enough room to display a button in its specified width.
Conclusion
This blog extensively discussed the application and uses of the JavaFX Button and how it can be created by instantiating the Button class. If you think this blog has helped you enhance your knowledge about JavaFX Button and if you would like to learn more, check out our articles JavaFX, JavaFX Rotate Transition, JavaFX Scale Transition, and JavaFX Fill Transition.


 9+ registered

