Example of Django project using MVT
We will first create a folder named “Django_MVT”.
Setting up the Django Project
django-admin startproject django_basic_mvt
cd django_basic_mvt
python3 manage.py startapp homepage
In the settings.py file, we will add the name of the newly formed app ‘homepage’ to the INSTALLED_APPS list.
django_basic_mvt/settings.py:
INSTALLED_APPS = [
  'django.contrib.admin',
  'django.contrib.auth',
  'django.contrib.contenttypes',
  'django.contrib.sessions',
  'django.contrib.messages',
  'django.contrib.staticfiles',
  'homepage',
]

You can also try this code with Online Python Compiler
Designing the Django Model
A model is simply a database design. Here, we'll build a simple ‘Student’ database model. This is provided in the models.py file in the homepage application's freshly created directory.
homepage/models.py:
from django.db import models

# Create your models here.

class Student(models.Model):
  name = models.CharField(max_length=250)
  rollno = models.CharField(max_length=250)

  def __str__(self):
      return self.name
You can also try this code with Online Python Compiler
Setting up Migrations
Django uses the sqlite3 database, as defined in the settings. This can be adjusted to suit our needs.
DATABASES = {
  'default': {
      'ENGINE': 'django.db.backends.sqlite3',
      'NAME': BASE_DIR / 'db.sqlite3',
  }
}
You can also try this code with Online Python Compiler
Now, we will run the command:
python3 manage.py makemigrations homepage
We will get a similar output:

The command ‘makemigrations’ informs Django that some modifications to the specified model have been made and that the changes must be saved as a migration. Django uses ‘migrations’ to keep track of changes to the models and the database schema.
Running the Migrate
Then, to make changes in the database, we will run the migrate command to apply the migrations.
python3 manage.py migrate
We will get a similar output:

According to the database settings specified in the ‘settings.py’ file, the ‘migrate’ command builds necessary database tables for all apps indicated in the INSTALLED_APPS setting.
Entering the Data in Shell
Use the following command to launch the Python shell:
python3 manage.py shell
We can read data and enter/edit data once we're inside the shell as follows:

Running the Server & Django Admin Interface
Django features its own built-in admin interface that allows site managers, employees, and clients to manage the website's data. This is not meant for site visitors to use.
First, we will create a user who will use this command to log into the admin site. After that, we will type in our selected username, email address, and password. A dummy email can be used for testing purposes.
python3 manage.py createsuperuser
We will then enter the username, email address and password according to our choice.

Now, we will use the command to start the development server.
python3 manage.py runserver
We will get a similar output:

The web application is now deployed at ‘http://127.0.0.1:8000/’.

Going to ‘http://127.0.0.1:8000/admin’, we will then login as admin using the ‘username’ and ‘password’ given while creating a superuser.

We will see the Django admin index page upon logging in as admin.

Since we cannot see the Student data here, we will register our ‘Student’ objects with the admin interface.
homepage/admin.py:
from django.contrib import admin
from .models import Student
# Register your models here.

admin.site.register(Student)
You can also try this code with Online Python Compiler
The server will immediately refresh after saving the file, and we can now see our Student data in the admin interface.

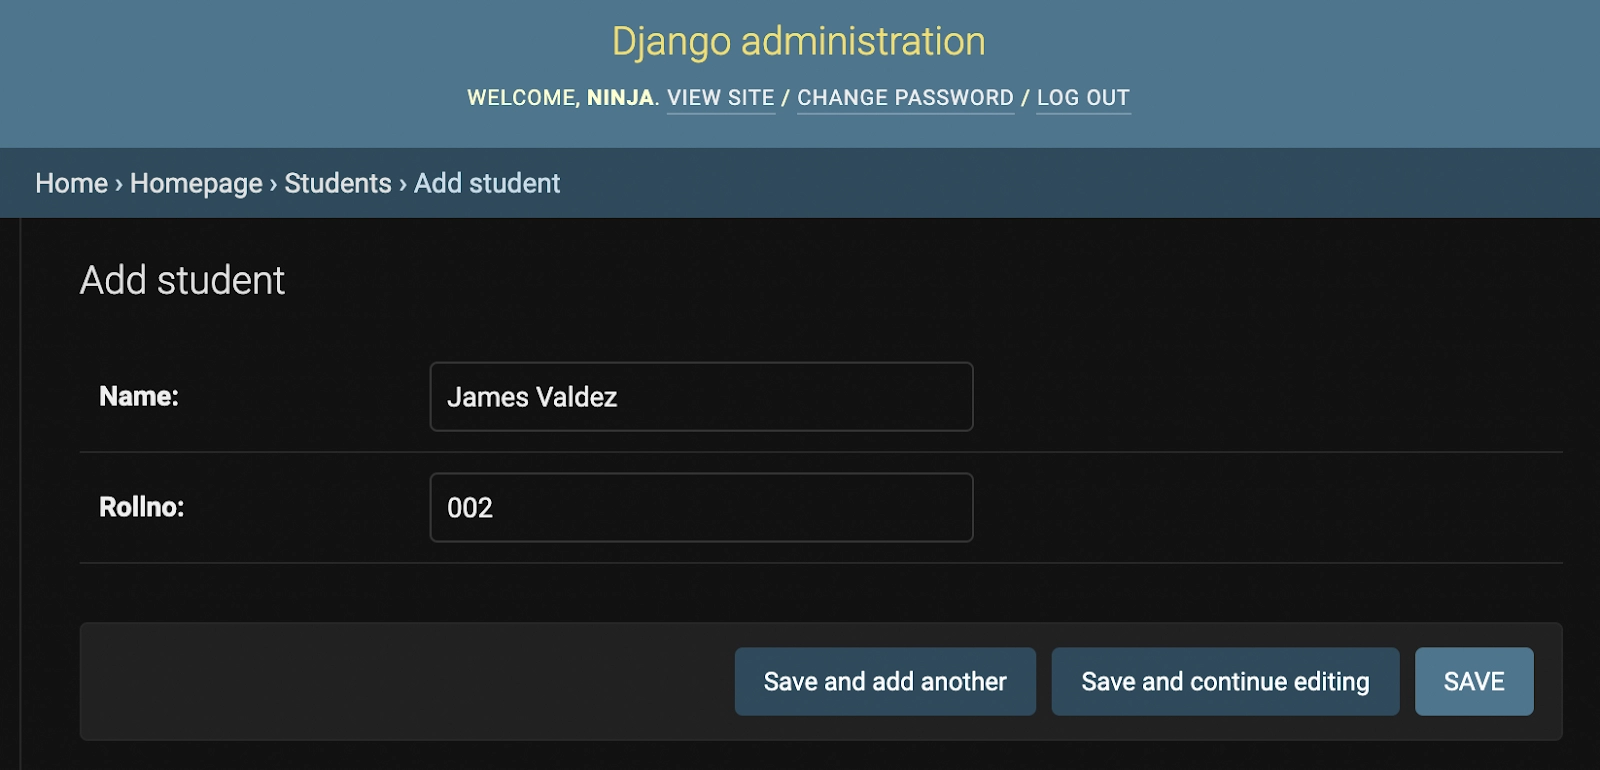
We can use the admin panel to add new data to the Student section by clicking on it.

Creating the Template
Then, as the site visitor, we will develop an HTML template in Django to view the data.
homepage/templates/homepage/index.html:
<!DOCTYPE html>

<head>
  <title>Student Information</title>
</head>

<body>
  <h2>Student Information</h2>

  {% if students_list %}
  <ul>
      {% for student in students_list %}
      <li> <b> {{student.name}} </b> | {{student.rollno}} </li>
      {% endfor %}
  </ul>
  {% else %}
  <p>No student information available in the database. </p>
  {% endif %}
</body>

</html>
Creating the View and URLs
We will then create a view to show the user the data/information in the database.
homepage/view.py:
from django.shortcuts import render

# Create your views here.
from .models import Student


def index(request):
  students_list = Student.objects.all()
  context = {'students_list': students_list}
  return render(request, 'homepage/index.html', context=context)
You can also try this code with Online Python Compiler
All objects are collected and passed to the context at this point. A context is a dictionary that transforms the names of template variables into Python objects.
homepage/urls.py:
from . import views
from django.urls import path

urlpatterns = [
  path('', views.index),
]
You can also try this code with Online Python Compiler
We will create a URL pattern for this application in our project's URL patterns, i.e., django_basic_mvt.
django_basic_mvt/urls.py:
from django.contrib import admin
from django.urls import include, path

urlpatterns = [
  path('', include('homepage.urls')),
  path('admin/', admin.site.urls),
]
You can also try this code with Online Python Compiler
Upon starting the server, we will get the following output:

Output
Frequently Asked Questions
- What is the use of the ‘manage.py’ file in the Django project using MVT?
Ans: ‘manage.py’ file is used to interact with our project from the command line (for example, to start the server, sync the database, and so on). In the command window, type the following code to get the complete list of commands that ‘manage.py’ may execute:
$ python3 manage.py help
2. How is the Django project deployed?
Ans: The Django project is deployed using the ‘wsgi.py’ file. It helps communication between our Django application and the webserver.
Key Takeaways
We have learned how to create a basic Django project using MVT in this blog. Django uses the MVT (Model-View-Template) architecture. MVT is a software design pattern for web application development.
Go through The Basics of Django Framework to deeply understand the concept of Django, which will help create a basic Django project using MVT.
Also read, Spring Boot Architecture

Credits: GIPHY
Happy Developing!


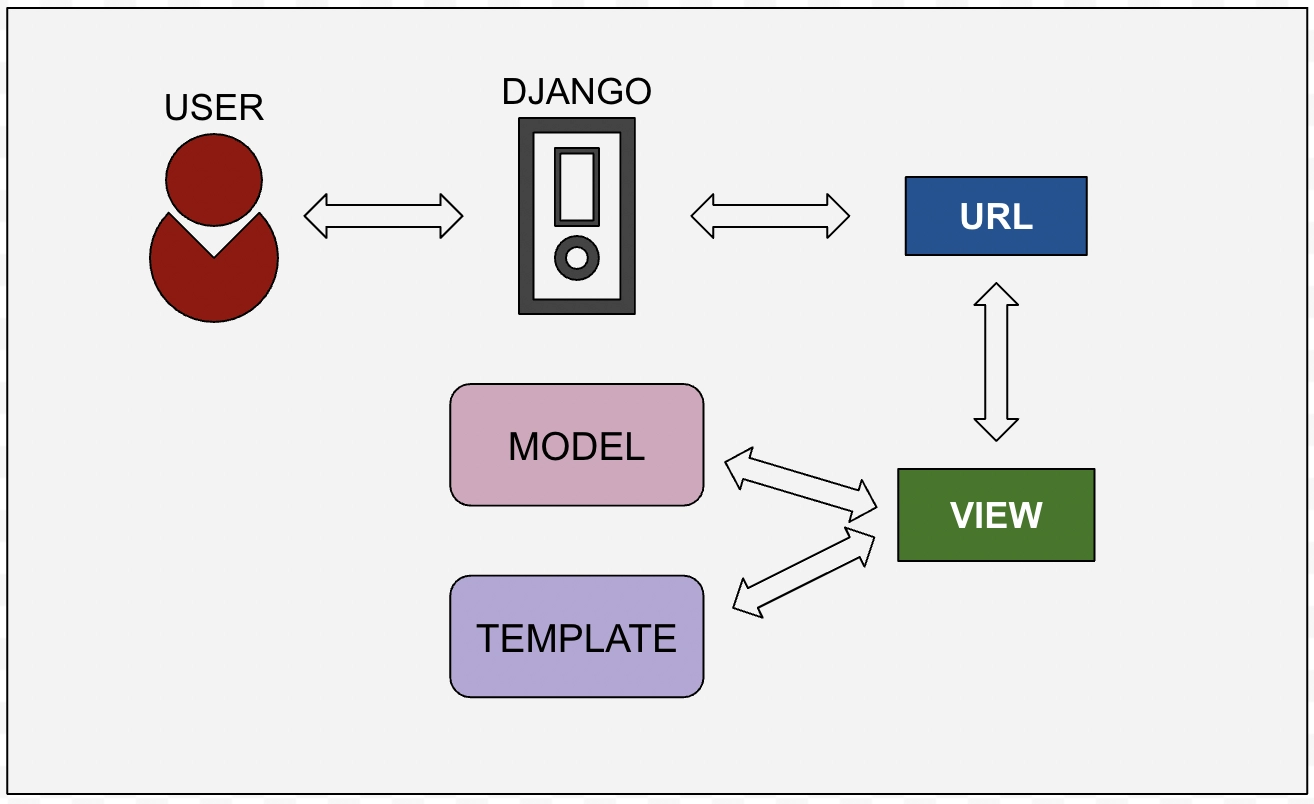 The MVT-based control flow is depicted in this graph.

 8+ registered

