Creating User Bean and User Service
We will develop actual resources, users, and the post in this part. To represent the data, a static array list will be used.
Step 1: Build a new package having the name com.codingninjas.server.main.user.
Step 2: To store the user detail, create a bean class (User).
Step 3: Declare three private variables to store id name and date of birth as id, name, and dob.
Step 4: Generate getters and setters.
Go to file -> Source -> Generate Getters and Setters... ->Select All -> Generate.
Step 5: Generate toString.
Go to file -> Source -> Generate toString... ->Select All -> Generate.
Step 6: Generate constructors.
Go to file -> Source -> Generate Constructor using Fields... -> Generate.
User.java
package com.codingninjas.server.main.user;

import java.util.Date;

public class User
{
	/* Declaring private variables */
	private String name;
	private Integer id;
	private Date dob;


	public User(Integer id, String name, Date dob)
	{
		super();
		this.name = name;
		this.id = id;
		this.dob = dob;
	}

	/* gettters */
	public Integer getId()
	{
		return id;
	}
	public String getName()
	{
		return name;
	}
	public Date getDob()
	{
		return dob;
	}


	/* setters */
	public void setId(Integer id)
	{
		this.id = id;
	}
	public void setName(String name)
	{
		this.name = name;
	}
	public void setDob(Date dob)
	{
		this.dob = dob;
	}

	@Override
	public String toString()
	{
		return String.format("User [id=%s, name=%s, dob=%s]", id, name, dob);
	}
}
Before going on to the next step, move HelloWorldController.java and HelloWorldBean.java in the com.codingninjas.server.main.helloworld package.
Step 7: Create UserDaoService class in the com.codingninjas.server.main.user package.
UserDaoService.java
package com.codingninjas.server.main.user;
import org.springframework.stereotype.Component;
import java.util.ArrayList;
import java.util.List;
import java.util.Date;

@Component
public class UserDaoService
{
	public static int usersCount=3;

	/* creating an instance of ArrayList */
	private static List<User> users=new ArrayList<>();

	/* static block */
	static
	{
		// appending users to the list
		users.add(new User(1, "Soham", new Date()));
		users.add(new User(2, "Rajat", new Date()));
		users.add(new User(3, "Mayank", new Date()));
	}

	/* retrieving all users from the list */
	public List<User> findAll()
	{
		return users;
	}

	/* method which adds user in the list  */
	public User save(User user)
	{
		if(user.getId()==null)
		{
			/* increment user id */
			user.setId(++usersCount);
		}
		/* adding user */
		users.add(user);
		return user;
	}


	/* method for finding particular user */
	public User findOne(int ID)
	{
		for(User u:users)
		{
			if(u.getId()==ID)
			return u;
		}
		return null;
	}
}
Implementing Get Methods for User Resource
Step 8: Creating a user controller class “UserResource”.
UserResource.java
package com.codingninjas.server.main.user;

import java.util.List;
import org.springframework.web.bind.annotation.RestController;
import org.springframework.web.bind.annotation.GetMapping;
import org.springframework.beans.factory.annotation.Autowired;

@RestController
public class UserResource
{
	@Autowired
	private UserDaoService service;
	@GetMapping("/users")
	public List<User> retriveAllUsers()
	{
		return service.findAll();
	}
}
Step 9: Run the application. Now type “localhost:8080/users” in the search bar of the browser. This will return the list of users in JSON format.
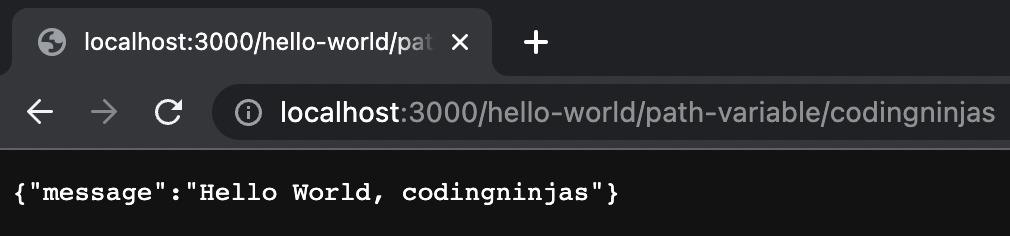
Step 10: We can also display a specific user in the browser using the id of the user. Simply add the mapping “/user/{id}/” and create retrieveUser() method in the UserResource.java.
UserResource.java
package com.codingninjas.server.main.user;

import java.util.List;
import org.springframework.web.bind.annotation.PathVariable;
import org.springframework.web.bind.annotation.RestController;
import org.springframework.web.bind.annotation.GetMapping;
import org.springframework.beans.factory.annotation.Autowired;


@RestController
public class UserResource
{
	@Autowired
	private UserDaoService service;
	@GetMapping("/users")
	public List<User> retriveAllUsers()
	{
		return service.findAll();
	}


	/* returns the information of specific user */
	@GetMapping("/users/{id}")
	public User retriveUser(@PathVariable int id)
	{
		return service.findOne(id);
	}
}
Step 11: Once again, run the application. Now type “localhost:8080/users/{id}” in the search bar of the browser. You will be getting detailed information about the user associated with that specific id.
Check out this problem - Root To Leaf Path
Frequently Asked Questions
Why we use PathVariable in Spring Boot?
@PathVariable in Spring Boot is used to capture dynamic values from the URL path, allowing flexible and customizable request handling in RESTful APIs.
How to make path variable mandatory in Spring Boot?
To make a path variable mandatory, simply define it in the URL pattern; Spring Boot requires it for the method to work correctly without defaults.
What is the default value of @PathVariable in Spring?
By default, @PathVariable does not have a value unless provided in the URL. If not present, Spring Boot throws an exception or error.
Conclusion
In this article, we have extensively discussed the enhancement of the Hello World Service with a Path Variable. Incorporating a path variable into the "Hello World" service significantly enhances its flexibility and usability. By allowing dynamic inputs through the URL, we can create more interactive and personalized web services. This simple enhancement, while fundamental, opens the door to building more complex and responsive applications in Spring Boot. Understanding how to effectively use path variables is a key skill for developers working with RESTful APIs and building scalable, user-friendly web services.
If you want to learn more, check out our articles on Implementing DELETE Method to Delete a User Resource, Technological Services in Ready API, What Is Web2Py?, Why To Use Web2py?, Postbacks and Internationalization in web2py, Third Party Modules In Web2py, Tasks In Web2py, and XML in Web2py.


 8+ registered

