Do you think IIT Guwahati certified course can help you in your career?
Introduction
Chef Infra is a widely accepted automation tool that transforms the infrastructure into a codebase. Whether you use Cloud, a Local system, or a hybrid environment does not matter.
It takes care of the infrastructure configuration, deployment, and maintenance.
System Requirements
Before installing Chef Infra, ensure the following-
The machine running the infra is explicitly powerful.
Each system that you will manage is dependent on the supported platform.
The network and Firewall configuration is accurate.
Chef Infra Server
Chef Infra Server must be able to satisfy the following needs of the system, whether it runs on a cloud or premises-
64-bit CPU architecture
CPU support for SSE4.2 extensions
Four total cores
8 GB of RAM or more
5 GB of free disk space in /opt
10 GB of free disk space in /var
The user must fulfill these requirements before installing the Chef Infra Server.
Hostnames
FQDNs
NTP
Mail Relay
cron
git
Apache Qpid
Required users
Firewalls and ports
Chef Infra Client
The minimum necessary Random Access Memory should be 512MB.
A minimum of 200MB and 600Mb disk space is essential for Linux and windows, respectively. This is the memory need of Chef Infra Client Binaries which are stored in the directory.
1 GHz or faster processor is recommended for the smooth running of the application.
The Chef workstation requires 64-bit Architecture, a minimum of 4GB RAM, and 2GB of disk space to function.
Install Using Bootstrap
It allows the user to install Chef Infra Client on a target system, so it runs as a client and makes the node communicate with a Chef Infra Server. There are two ways to do this:
Run the knife bootstrap command.
Perform an install to bootstrap from the node itself.
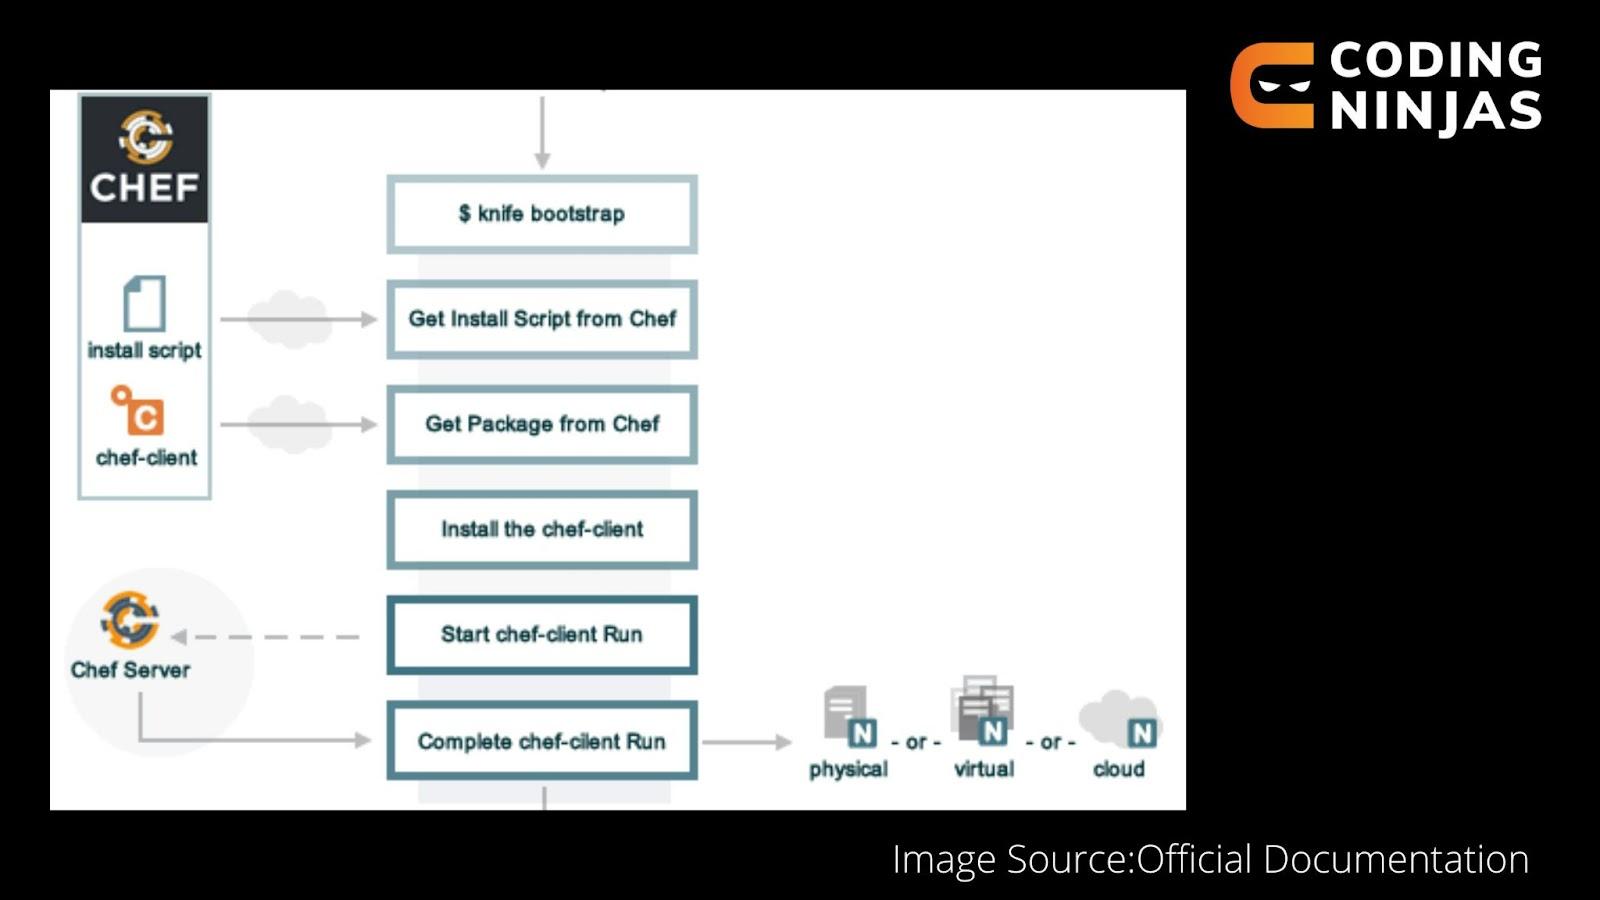
The following diagram illustrates the operations that occur when installation is done using Bootstrap.
The following happens in a knife bootstrap operation:-
Stages
Description
Knife bootstrap
Initially, the knife-bootstrap command is initiated.
Install script from the chef
The script shell requests the chef website to provide the latest version of the chef infra client.
Get the chef infra package.
The appropriate package is downloaded after obtaining system-specific information.
Install Chef Infra Client
A native package downloads the Chef Infra client.
Start a Chef Infra Client run
First-boot.json is generated as a part of the knife-bootstrap command
Complete the Chef Infra Client Run.
By default, the first client run contains an empty run list.
Knife Bootstrap- Itis a widespread technique to carry out the installation by directly giving the node access to the chef's website. It automatically judges the latest version and the operating system compatibility.
For more information on how to run the bootstrap command, Please refer to the official documentation.
After the identification of FQDN(Fully Qualified Domain Name) and Ip Address, run the following command-
knife bootstrap 172.16.1.233 -U USERNAME --sudo
Verify that the chef infra server recognizes the node by running the following command-
knife client show NAME_OF_NODE
For viewing the complete list of nodes associated with the Chef Infra Server, run the following command-
knife client list
Unattended Installs
This method eliminates the need for SSH for the installation process. It facilitates the installation on its own. Chef Infra Client may be included in an image that launches the Chef Infra Client at boot, deployed using User Data, or installed using another type of post-deployment script when using an unattended bootstrap.
Working with Proxies
Many chef commands do not work properly if not configured. This generally happens in a proxy-driven environment.
To begin working with proxies, first, you need to determine the proxy server and then configure it. The processes are different in both Operating Systems.
For HTTP, HTTPS, and FTP, the user can specify proxy settings in the configuration files for the knife and the Chef Infra Client.
The default value is usually NIL for http_proxy_pass, https_proxy_pass, ftp_proxy_pass, http_proxy_user, https_proxy_user, and ftp_proxy_user.
The no_proxy setting lists addresses for which the user cannot use the proxy.
Some applications may ignore the proxy settings and follow them partially. So, in these situations, environment variables are used to set the proxy.
Chef Infra Client will set the ENV variable depending on these settings if HTTP proxy, HTTPS proxy, FTP proxy, or no proxy is set in the client.rb file but not in the ENV.
These Ruby gems need to be present to install private Supermarket-
mixlib-install
mixlib-shellout
mixlib-versioning
artifactory
Create an install script
An install script is utilized to install Chef Infra Client when the user bootstraps a new node. It pulls the Chef Infra Client package from the artifact store.
#!/bin/bash

cd /tmp/
wget http://packages.example.com/chef_13.2.20-1_amd64.deb
dpkg -i chef_13.2.20-1_amd64.deb
Private Supermarket
Allows you to host your internal version of the Chef Supermarket. This is done using your air-gapped network.
To begin with, you have to configure Chef Identity credentials.
Log on to the server and update the /etc/opscode/chef-server.rb configuration file


 5+ registered