


Introduction📜
Spring Boot is a project that uses the Spring Framework as its foundation. It makes setting up, configuring, and running simple web-based applications easier and faster.
Spring Boot is the foundation of every developer's experience, regardless of what they're building. Spring Boot helps us to do it as quickly as possible with the least amount of configuration required upfront.

In this blog, we will learn how to Implement Validations for RESTful Services in spring boot.
Implementing Validations 🔐
Validation is a prerequisite for all services. We will go through the Java Validation API and how to use it to add validation to our beans file. When we receive a request to create a user, we must validate its content. If it is invalid, we need to respond appropriately.
Let's see how to validate a request in the spring project.
You need to follow some steps to implement validation in the spring project.
Step 1: Open the UserResources.java file.
Step 2: Add @Valid annotation. It is a Javax validation API. The default classpath of this annotation is spring-boot-starter-web.
UserResources.java
package com.codingninjas.server.main.user;
import java.net.URI;
import java.util.List;
import javax.validation.Valid;
import org.springframework.web.bind.annotation.DeleteMapping;
import org.springframework.web.bind.annotation.GetMapping;
import org.springframework.beans.factory.annotation.Autowired;
import org.springframework.http.ResponseEntity;
import org.springframework.web.bind.annotation.RequestBody;
import org.springframework.web.bind.annotation.RestController;
import org.springframework.web.bind.annotation.PathVariable;
import org.springframework.web.bind.annotation.PostMapping;
import org.springframework.web.servlet.support.ServletUriComponentsBuilder;
@RestController
public class UserResources
{
@Autowired
private UserDaoService service;
@GetMapping("/users")
public List<User> getAllUsers()
{
return service.findAll();
}
//Get a particular user detail
@GetMapping("/users/{id}")
public User getUser(@PathVariable int id)
{
User user= service.findOne(id);
if(user==null)
//Throws Runtime Exception
throw new UserNotFoundException("id: "+ id);
return user;
}

//Method to delete a user resource
@DeleteMapping("/users/{id}")
public void deleteUser(@PathVariable int id)
{
User user= service.deleteById(id);
if(user==null)

//Throws Runtime Exception
throw new UserNotFoundException("id: "+ id);
}

@PostMapping("/users")
public ResponseEntity<Object> createUser(@Valid @RequestBody User user)
{
User sevedUser=service.save(user);
URI location=ServletUriComponentsBuilder.fromCurrentRequest().path("/{id}").buildAndExpand(sevedUser.getId()).toUri();
return ResponseEntity.created(location).build();
}
} 
Step 3: Open Users.java file.
Step 4: Add @Size(min = 5) annotation just above the name variable. This will make sure that the name length should not less than 5.
Users.java
package com.codingninjas.server.main.user;
import java.util.Date;
import javax.validation.constraints.Size;
import javax.validation.constraints.Past;

public class User
{
private Integer id;

@Size(min=5)
private String name;
private String city;

//Default constructor
protected User()
{

}

public User(Integer id, String name, String city)
{
super();
this.id = id;
this.name = name;
this.dob = dob;
}
public Integer getId()
{
return id;
}
public void setId(Integer id)
{
this.id = id;
}
public String getName()
{
return name;
}
public void setName(String name)
{
this.name = name;
}
public String getCity()
{
return city;
}
public void setCity(String city)
{
this.city = city;
}
@Override
public String toString()
{
return String.format("User [id=%s, name=%s, city=%s]", id, name, city);
}
}
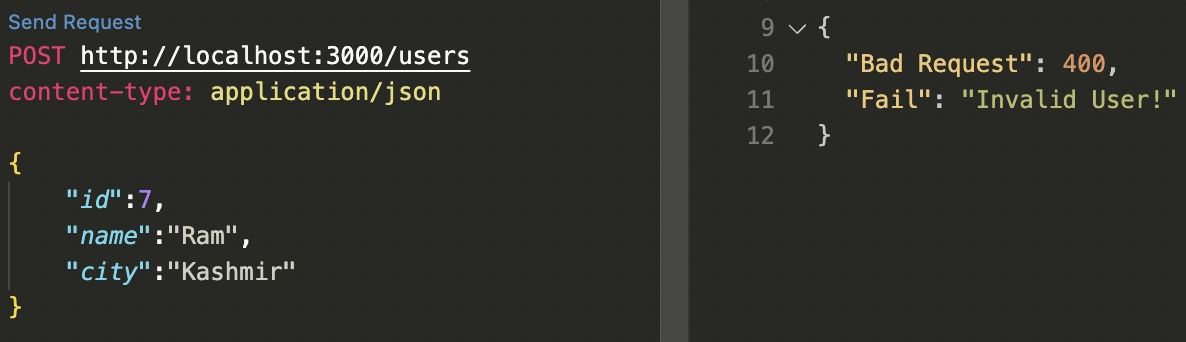
Step 5: Open RestClient in VS Code, select Send Request and send the POST request to the URL: localhost:3000/users.
It will return Status: 201 Created.

Send another POST request. But this time the name should have less than five characters.
It will return the Status: 400 Bad Request.


 8+ registered

