


Introduction📜
Have you ever dealt with the difficult issue of serving your customers in their own language? If so, you might be interested in locating a suitable strategy for accomplishing this.
This blog will explain how to easily add internationalization to our Spring Boot application in simple steps. So without any further delay, let's get started!
What is Internationalization?
When dealing with a project that should serve users from multiple nations with different languages, the issue of application internationalization becomes difficult. In these circumstances, we will need to offer our French-speaking users a response message in French to make everyone comfortable using our programme.
The process of making web applications and services so that they can automatically support multiple countries and languages without requiring changes to the application is known as internationalization. The word internationalization contains a total of 18 characters, starting with I and ending with N. It is also known as I18N.
Java provides the framework for server applications and desktops. The following crucial functional internationalized areas are listed.
| Functional Internationalised Areas | Description |
|---|---|
| Localization & Locale identification | Locale is a Java identifier that can be used to ask for locale-specific functionality in various functional areas. The ResourceBundle class supports localization. Access to locally specific objects, such as strings, is made available by the class. |
|
Handling dates and times
|
Java comes with several calendars. It enables conversion to and from Date objects independent of the calendar. Java supports all time zones in the world. |
| Text Representation | The Unicode character set, which is the foundation of Java, is implemented by some libraries. |
| Date and time handling | Java provides various calendars. It supports conversion to and from calendar-independent Date objects. Java works fine for all the time zones in the world. |
| Text processing | Character analysis, case mapping, string comparison, word-by-word text analysis, and the formatting of dates, time values, and numbers into strings or parsing them back from strings. These are all examples of text processing. |
To internationalise the service, two configurations are required.
🟩LocaleResolver
🟢Default Locale - Locale.Us
🟩ResourceBundleMessageSource
Default Locale is Locale.US. It returns the default locale if the location is not specified. The ResourceBundle needs to be customised as well. The properties will be kept in ResourceBundle. Spring MVC uses the ResourceBundleMessageSource concept to manage properties. MessageSource and the Accept-Language header will be used after that.
Now, Let us configure the internationalization:
Step 1: Open RestfulWebServicesApplication.java file.
Step 2: Configure a Bean for the default locale.
@Bean
public  LocaleResolver localeResolver()
{
SessionLocaleResolver localeResolver = new SessionLocaleResolver();
localeResolver.setDefaultLocale(Locale.US);
return localeResolver;
} 
Step 3: Now, we need to store the properties in a file called messages.properties.
Click right on the src/main/resources folder -> New -> File -> Provide the file name: messages.properties. It will contain the default locale message.
messages.properties
good.evening.message=Good Afternoon
Step 4: Make a property file with the name messages_fr.properties for the French people. It will contain messages for France.
messages_fr.properties
good.evening.message=Bonsoir
Step 5: Under the input accepts header, read the properties and modify them. To specify a different Bean for a ResourceBundle, open the RestfulWebServicesApplication.java file.
@Bean
public ResourceBundleMessageSource bundleMessageSource()
{
ResourceBundleMessageSource messageSource = new ResourceBundleMessageSource();
messageSource.setBasename("messages");
return messageSource;
}
RestfulWebServicesApplication.java
package com.codingninjas.server.main;
import java.util.Locale;
import org.springframework.boot.SpringApplication;
import org.springframework.boot.autoconfigure.SpringBootApplication;
import org.springframework.context.annotation.Bean;
import org.springframework.context.support.ResourceBundleMessageSource;
import org.springframework.web.servlet.LocaleResolver;
import org.springframework.web.servlet.i18n.SessionLocaleResolver;
@SpringBootApplication
public class RestfulWebServicesApplication
{
public static void main(String[] ar)
{
SpringApplication.run(RestfulWebServicesApplication.class, ar);
}
/* configuring default locale */
@Bean
public  LocaleResolver localeResolver()
{
SessionLocaleResolver localeResolver = new SessionLocaleResolver();
localeResolver.setDefaultLocale(Locale.US);
return localeResolver;
}
/* configuring the ResourceBundle */
@Bean
public ResourceBundleMessageSource messageSource()
{
ResourceBundleMessageSource messageSource = new ResourceBundleMessageSource();
messageSource.setBasename("messages");
return messageSource;
}
}
Step 6: To use these sources, update the service. Autowire the MessageSource in the HelloWorldController.java file and open it.
@Autowired
private MessageSource messageSource;
HelloWorldController.java
package com.codingninjas.server.main.helloworld;
import org.springframework.web.bind.annotation.GetMapping;
import org.springframework.web.bind.annotation.PathVariable;
import org.springframework.web.bind.annotation.RequestHeader;
import org.springframework.web.bind.annotation.RestController;
import java.util.Locale;
import org.springframework.beans.factory.annotation.Autowired;
import org.springframework.context.MessageSource;
import org.springframework.context.annotation.Configuration;
@Configuration
/*Controller*/
@RestController
public class HelloWorldController
{
@Autowired
private MessageSource messageSource;
/* using hello-world */
@GetMapping(path="/hello-world")
public String helloWorld()
{
return "Hello World";
}
@GetMapping(path="/hello-world-bean")

public HelloWorldBean helloWorldBean()
{
return new HelloWorldBean("Hello World");
/* HelloWorldBean constructor */
}
@GetMapping(path="/hello-world/path-variable/{name}")
public HelloWorldBean helloWorldPathVariable(@PathVariable String name)
{
return new HelloWorldBean(String.format("Hello World, %s",name));
}
/* internationalization */
@GetMapping(path="/hello-world-internationalized")
public String helloWorldInternationalized(@RequestHeader(name="Accept-Language", required=false) Locale locale)
{
return messageSource.getMessage("good.evening.message", null, locale);
}
}
Step 7: Open Postman, a REST client. Pick the GET request option. Enter http://localhost:8080/hello-world-internationalized. Type the following into the Headers tab:
| Key | Value |
| Content-Type | application/json |
| Accept-Language | us |
Now, Click on the Send button.
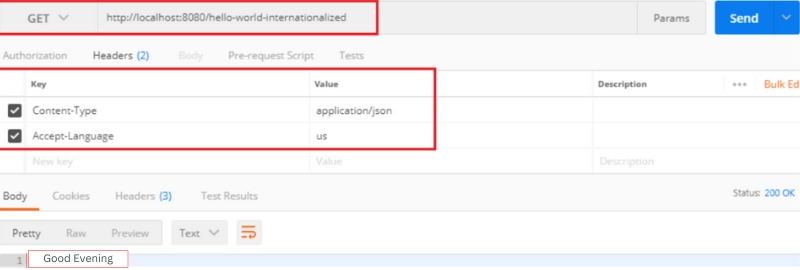
It will return US locale message, i.e., Good Evening.
We now issue another GET request while changing the RequestHeader from us to fr.
| Key | Value |
| Content-Type | application/json |
| Accept-Language | us |
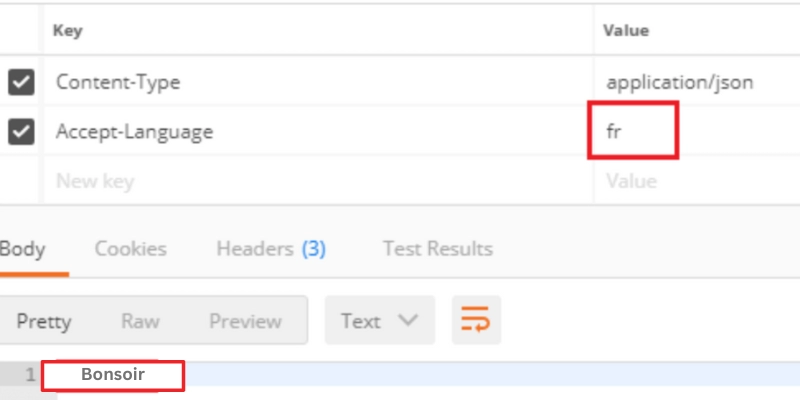
So, now it returns the message Good Evening in French, i.e., Bonsoir.


 9+ registered

